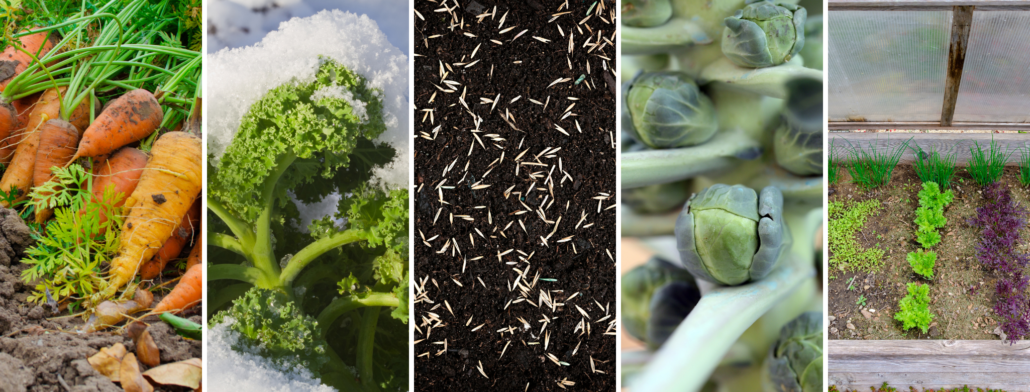
As the hint of fall rolls in with the cooler nights and shorter days, we begin to reap the benefits of all our hard work this spring and summer. We turn our thoughts to harvesting, preserving and utilizing all the fruits of our labors, which in itself can be a big task. If you’re looking to extend your harvest season, however, now is the time to get those late fall harvest veggies planted and think about what can be overwintered.
Here in Western Washington, we benefit from a temperate climate where we can get multiple crops of many of the short season veggies. Our first frost date can vary a bit depending on altitude and microclimates, but generally will fall sometime in October to November. You can find your specific first frost date by entering your zip code HERE. This will give you a date to work back from when determining which veggies you will be able to plant now and harvest before the frost, or that should be mostly mature by then for overwintering. So, here in Langley WA, our first frost date is going to be in late October or early November, approximately Nov. 9th according to the Farmer’s Almanac. I can then look at seed packets for the things I’m considering planting for a late fall or winter harvest and figure out whether they’ll have time to mature enough by then. The list below will suggest possible crops but be sure to check your specific varieties’ packets or labels to be sure they’ll work. Here are some things to consider planting now and some even in the next couple of weeks.
Direct Sow (seeds):
Beets, carrots, arugula, lettuce, radishes, rutabagas, peas, turnips, spinach, mustard greens, pac choi, mache/corn salad, shallots and garlic (in Oct or Nov).
Be sure to water your seeds and transplants regularly as it is still summer, and they need even moisture to grow well. It can help to sow or transplant in spaces that get some shade or to put up a temporary shade cloth to help harden off new plants and prevent scorching seedlings. If you can find the time to get more veggies started, it will pay off late fall and into winter when you’ve got fresh food for your table long after many gardens have stopped producing!
Overwintering is a way to let nature preserve our mature cold hardy veggies, and harvest them as needed throughout the winter, and sometimes even into early spring. Not all veggies will hold up to overwintering, but some that have worked well for me are: carrots, broccoli, brussels sprouts, kale, leeks, some lettuces, cabbage, collards, mache, and garlic. Though these are cold hardy, it is still a good idea to protect them from freezing, if possible, by mulching underground parts with a thick layer, and for above ground parts utilizing row covers, cold frames, or similar protections. While it is nearly impossible to harvest during a deep freeze or snow event, when things warm back up you can begin to harvest again.
http://ventureoutnursery.com/wp-content/uploads/2016/03/Final-Logo-1-1.jpg00Callunahttp://ventureoutnursery.com/wp-content/uploads/2016/03/Final-Logo-1-1.jpgCalluna2023-08-04 22:43:122023-08-04 22:43:14Keep the Harvest Going
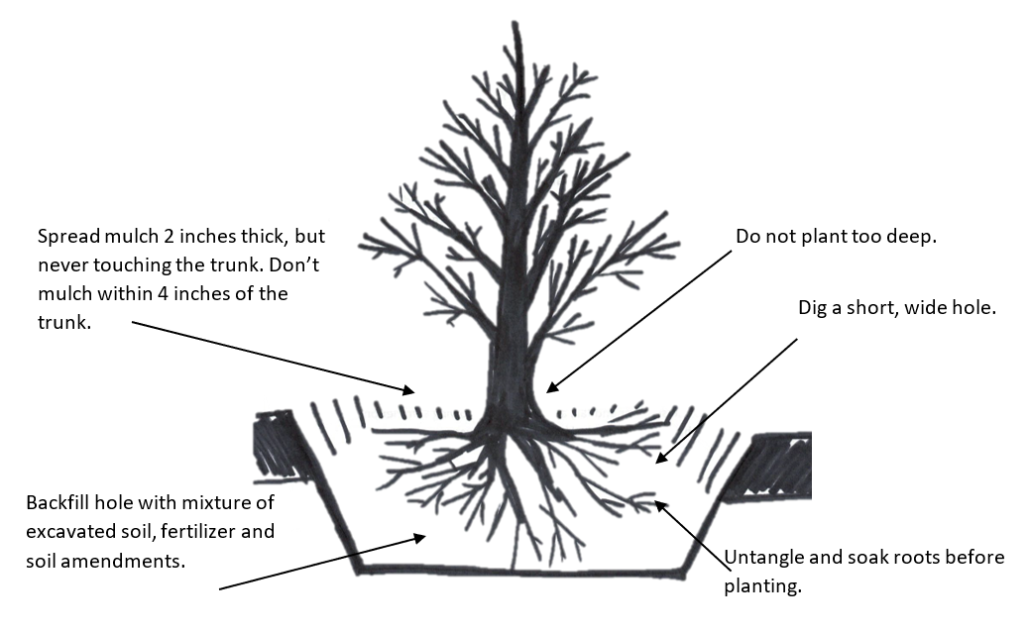
Planting a bare-root tree or shrub is easy! There are just a few tricks you should know. These instructions should help. If you have any questions, stop by the nursery or give us a call!
Unpack your plant. Remove it from the bag, and loosen or remove any tightly-wound tags or stem tapes. Carefully untangle the roots. Trim off any broken roots or branches. If the roots have dried out, soak them in plain, air-temperature water for 15 minutes to 3 hours. Do not soak for more than 4 hours. If you cannot plant your bare root tree right away, put it outside and cover the roots with moist sawdust or mulch. Try not to store your tree this way for longer than several days. Planting immediately after purchasing is ideal!
Dig a short, wide hole, about 2′-3′ deep and wide. It should be wide enough that the roots can grow outward without crowding. If you find you dug the hole too deep, put some soil back in and firm it down with your foot to prevent settling.
Using the excavated field soil, make a mound in the center of the hole, gently firming the soil as you create the mound to avoid settling. Place your plant atop the mound, spreading the roots out evenly down the sides of the mound. Take care that you are not planting too deeply; the crown should be above the soil. It is better to plant too high than too low.
Sprinkle a mycorrhizae inoculant over the bare roots.
Lightly amend the backfill soil with rich compost and a very light application of an organic starter fertilizer. Shovel the mixed soil into the hole, gently tamping it down as you go. It should be firmly but not tightly packed. Water generously to help settle the soil around the roots and into the hole. If you notice that your plant is sinking as the soil settles, it is VERY important to gently wiggle and lift your plant, or start over again and replant. Being planted too deeply can suffocate the root system and is the leading cause of tree death. It is better to plant too high than too low.
After the water has soaked in, spread a protective mulch 2-3 inches deep in a 3-foot diameter area around the base. Leave a 4-inch circle around the base of the plant, so the mulch never touches the trunk. We recommend our Soil Building Conditioner as a mulch.
If needed, stake your tree. Use 3 stakes, evenly spaced around the tree. Tie loosely enough so that the tree can move a bit, but tightly enough that it will not tip over. Trees need trunk movement to become strong and straight and self-supporting. Mark your calendar to remove the stakes after a season of growth.
Protect from rabbits and rodents. Make a 2′ – 3′ tall “tube” of galvanized hardware cloth or 1″ chicken wire to encircle the trunk. It should fit closely, but allowing an inch or so of room between the trunk and the barrier.
Protect from deer. You can make a “cage” around the tree by wrapping a length of field fence in a circle. Or use the stakes as a framework, and wind wire or fishing line around them. Take care that no wire or plastic is touching or wrapped around the trunk of the tree. Even trees that are “deer resistant” can be subject to rutting, and newly planted trees and shrubs can be knocked down by deer. It is never a bad idea to keep newly planted plants well-sprayed with deer & rodent repellant sprays – it can help to make a bad first impression!
Throughout the growing season, give your new tree plenty of water. Deep watering is recommended to help the tree develop a deep root system. Leave the hose on a trickle for 1-3 hours to make sure that water is soaking the entire root zone. It can be helpful to set a reminder alarm on your cell phone! The goal is to keep the soil moist but not soggy and to allow the soil to drain well between waterings. Deeply rooted trees are more drought-resistant in the long term. In the first season, a tree-gator bag can help make watering newly-planted trees a bit easier. If you have a spray irrigation system, DO NOT rely on it to provide adequate, deep watering. In the first 2 – 3 years you will need to supplement to make sure water is getting down deep enough.
Here’s a video with Tobey Nelson showing us the process!
http://ventureoutnursery.com/wp-content/uploads/2016/03/Final-Logo-1-1.jpg00Emily Martinhttp://ventureoutnursery.com/wp-content/uploads/2016/03/Final-Logo-1-1.jpgEmily Martin2023-02-02 17:46:002024-01-27 20:52:42How to Plant a Bare Root Tree
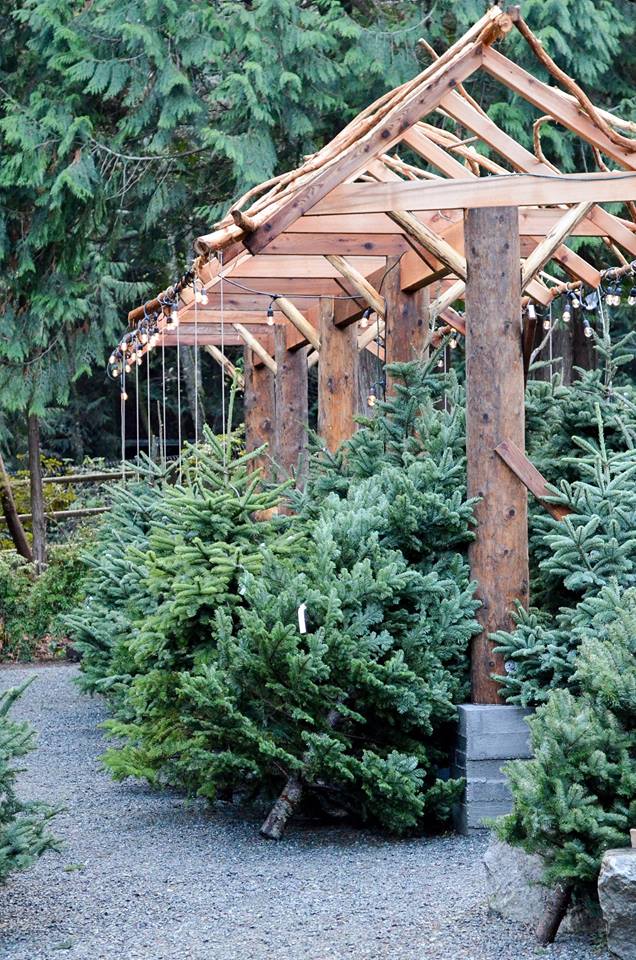
Follow these tips to keep your real Christmas tree as fresh as possible. If you are unable to set up your tree when you get home, store it in a cool sheltered area like the North side house, away from the wind and sun. With proper care, your Christmas tree will bring warmth and pleasure throughout the holiday season!
1. Make a fresh cut.
If you didn’t have us make a fresh cut at the Nursery, before you bring the tree into your home and place it in a stand, re-cut the trunk at least one inch from the bottom just before putting it in the stand. Even if you just cut it on a choose and cut farm, this re-opens the tree stem so it can drink water.
2. Choose a spot away from heat sources.
Heat sources like heat registers, space heaters, fireplaces, wood stove, televisions, computer monitors, etc. speed up evaporation and moisture loss of the tree.
3. Water immediately.
After making the fresh cut, place the tree in a large capacity stand with warm water. The stand you use should hold at least one gallon of fresh water.
4. Don’t add anything to the water.
Research has shown that plain tap water is the best. Some commercial additives and home concoctions can actually decrease a tree’s moisture retention and increase needle loss.
5. Check water level daily.
Do not allow the water level to drop below the fresh cut or the stem will reseal and be unable to drink. Christmas trees are very thirsty! It is not unusual for a tree to drink 2 gallons of water the first day it is the stand.
Living Christmas Trees
A Holiday Memory to Enjoy Year after Year!
Tired of investing in a beautiful conifer every December, only to throw it out in January? Consider purchasing a living Christmas tree to plant in your landscape after the holidays!
Tips for Success
1. Only keep living Christmas trees inside your home for a maximum of 7-10 days. We recommend moving the potted tree into your garage or other protected area for a week before moving it indoors. Likewise, after the holiday it’s a good idea to move it back to the garage for a week before planting. This allows the tree to adjust to the sudden change in temperature!
2.Living Christmas trees need water every day, but not too much! Once inside your home, an eight-foot conifer will enjoy about a quart of water per day, broken up into smaller doses. One way to do this is to sprinkle ice cubes over the root ball: they will melt slowly and water the tree a little at a time.
3.Use low-heat electric lights, and position the tree away from heaters to avoid drying out.
4. Choose an appropriate location to plant your tree: plenty of sunlight and well-draining soil are the two primary needs of most conifers.
5.Don’t fertilize until spring. Fertilizing during transplanting can stress the tree.
6. Water your transplanted tree.Keep an eye on your new tree for the first couple summers, and water it during periods of heat and drought. As the root system becomes more established, conifers become more independent and drought-tolerant.
Happy Holidays!
http://ventureoutnursery.com/wp-content/uploads/2016/03/Final-Logo-1-1.jpg00Venture Out Teamhttp://ventureoutnursery.com/wp-content/uploads/2016/03/Final-Logo-1-1.jpgVenture Out Team2021-11-29 23:28:042021-11-30 18:46:34Caring for your fresh cut and living Christmas Trees
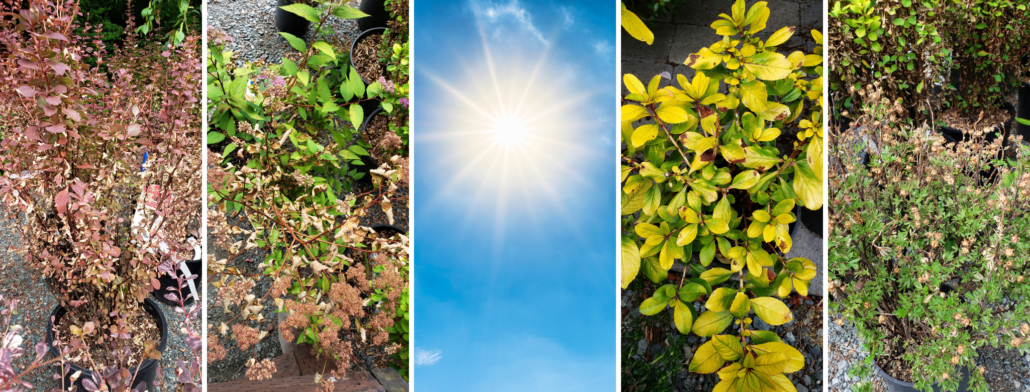
The recent heat wave fried a lot of gardeners and a lot of plants too! Just because a plant’s leaves are scorched does not mean the plant is dead.
There are two ways plants can be damaged by the intense heat and strong sun. To understand what happens to plants in extreme sunlight and heat, consider what happens to humans. Strong sun makes us thirsty and we get sunburned. It is the same with plants!
CAUSES OF SUN STRESS ON PLANTS
Plants need water to live. Roots take water from the soil, and it is drawn up through the plant to the foliage. If the hot sun dries out the soil, and there is no water for the plant to take up, the leaves will wilt. If the situation persists the leaf tissue, and then the stem tissue, will be damaged. It will eventually turn a crunchy brown.
Just like strong sunshine fries your skin tissues with the UV rays, plant leaf cells can be damaged by UV light – especially when there is a sudden change in the intensity of light (like because of a massive heat wave, or when you move a plant from shade to sun). This damage doesn’t necessarily correlate to moisture availability; even plants with adequate water can have scalded leaves. Intense UV can even scald the bark (and along with it the vascular tissue that lies just underneath) of thin-skinned trees such as Japanese Maples. This can result in more extensive damage: whole stems and branches supported by that scalded section of bark can die, due to disruption of the water supply due to the damage to the vascular tissue.
WHAT TO DO ABOUT SUN DAMAGED PLANTS
Is it dead or will it revive?
If a plant was drought-stressed and has a few crunchy leaves, it may enough to cut back the damaged tissue and give it a deep drink. If the damage is extensive – lots of dead stems with crunchy tips – you may need to cut the plant back to the ground and hope it regrows. If you aren’t sure whether to cut or not, try bending the tips. If they are flexible, then leave them alone – they aren’t dead! If they snap off, they are dead and you can cut back until you reach flexible tissue. You can also try the scratch test: scrape the bark in a small area with your fingernail or a knife. If it is green, there is life. If it is brown, it is dead.
If you kept your plant well-watered during the heat but nonetheless its foliage is turning white, or brown and crunchy, the best solution is to remove the damaged leaves. If the burn is not from this heat wave, but because you recently moved your plant from shade to sun, you may want to leave the damaged foliage in place until the plant has had a chance to acclimatize. A gradual introduction to more intense sunlight is preferred; that gives the plant time to “toughen up” the cells to tolerate more sunshine.
In either case, make sure the soil is moist. Consider applying a dilute solution of an organic liquid fertilizer that is high in Nitrogen (like a 4-0-1 or 3-2-3 fish emulsion). Maintain even soil moisture and you should see signs of life returning in 2 – 4 weeks.
If after 6 weeks there is no sign of life, it could mean mean that the root system was damaged by desiccation and got too dry to regrow, or that damage to the plant tissues was too extensive to recover from. Then it is time to visit the nursery for a replacement!
CONIFERS ARE A SPECIAL CASE
The above treatment works for perennials, grasses, and deciduous woody shrubs. Conifers require different treatment. Most conifers will not back-bud. This means they will not make new growth on bare branches or the trunk. If you cut them back, you may be removing their growing tips, and can cause permanent damage. If your conifer has brown crunchy foliage, simply remove the dead foliage without cutting back any branches. Give the plant a steady supply of water and see if new needles appear in the next several weeks. If after 6 weeks, there is no sign of life, it may mean you need to visit your local nursery for a replacement plant.
http://ventureoutnursery.com/wp-content/uploads/2016/03/Final-Logo-1-1.jpg00Tobey Nelsonhttp://ventureoutnursery.com/wp-content/uploads/2016/03/Final-Logo-1-1.jpgTobey Nelson2021-07-07 17:20:182021-08-04 18:26:18Heat and Sun Damaged Plant Care
Summer is peak season in our landscapes! Gardeners and plants alike are working hard. Get the most from your efforts and help your perennials, shrubs and trees do their best. Follow these tips for a lush, healthy, productive landscape through the summer and beyond.
Watering
Appropriate watering is critical to keeping plants growing and healthy. It is also important to consider our natural resources, and water as little as we can get away with while keeping our plants healthy. The best way to do this is to not water too early. When we water a lot at the beginning of summer we “train” our plants to be lush. Then, when the real heat and drought stress of summer sets in, our plants have a hard-to-sustain amount of foliage. We are forced to water like crazy to help them sustain this growth. Cultivate more resilient plantings by being conservative with supplemental water during May and June.
To really understand how much to water, it helps to know the needs of each plant as well as what kind of soil you have. In general, it is best to water deeply and less often, versus frequent and shallow. Watering slowly/at a low rate, and for a longer duration of time, ensures the water soaks deeply through the root zone. This helps roots establish in the soil horizons that stay moist and cool. In contrast, short shallow waterings encourage plants to root only in the top few inches of soil. This is the layer that is first to dry out in the heat of the sun. So set the hose on a trickle, place it at the crown of your plant, set a timer for 30 minutes to a few hours depending on the size and type of plant, and address other garden tasks while your plants get a nourishing deep drink.
Established gardens need less water than new plantings. In established beds, hopefully you can get away with watering just every couple of weeks or once per month during the summer. Of course, this depends on what types of plants you are growing. Not all plants are drought tolerant. Support these plants with less-frequent deep soakings to keep them going.
New plantings will need watering to help them through the hot dry months of summer. In general, perennials take 1 – 2 (rainy, wet) winters to really establish in the garden. Shrubs need 2 – 3 winters, and trees need 3 – 5. Any plants in your garden that are younger than this will need extra water to get established. In an ecologically ideal gardening world, we would be choosing drought-tolerant plants that fit our summer-dry climate. But even these plants need help to get established. Once established, it is possible to have a low-water or water-free garden!
Sandy soils do not hold water well. Gardeners with sandy soils will need to water more often, and for shorter duration since the water will run through. Help sandy soils hold water by adding organic material. Compost or Soil Building Conditioner is great for this.
Clay soils retain water, but it can hard to get the water to penetrate. Slow and steady is best here. Long trickle soaks are best. A slow steady trickle allows the water to permeate the clay and soak in, rather than running off. Add lots of organic material as well as calcium carbonate lime to help clay soils break up/form soil aggregates. As with sandy soils, compost or Soil Building Conditioner is great for this.
Feeding
In general, spring is the best time to fertilize. The exception to this is flowering annuals and veggies. It is good to feed these plants through the summer to keep the production – of blooms and fruits – coming. A liquid bloom-booster fertilizer is great. I like to give dilute amounts with each watering (according to package instructions). With any plant you plan to overwinter, it is best to stop fertilizing by early August to allow plants to harden off.
Weeding
It is always important to stay on top of weeding! Eliminating weeds means that your desired plants get all the water and soil fertility resources for themselves. Removing weeds before they set seed means fewer weeds next year!
My three most favorite weeding tools are a hori-hori (a Japanese weeding knife), a spading fork, and a triangle hoe weeder. The hori-hori is great for digging out tap-rooted weeds. Spading forks are indispensable for colonizing plants like Buttercup and Sorrel that propagate from root pieces. A fork will loosen the soil without cutting the roots, enabling you to remove the whole root mass while leaving little root system behind to propagate. The sharp triangle hoe weeder is great for slicing annual weed seedlings off just below the soil surface. You can also use the long point for jabbing out root masses of older more established weeds.
Mulching
Keeping soils covered with an organic mulch such as soil building conditioner or compost or woodchips is a great way to help retain soil moisture and suppress weeds. For more information about mulching, and which products are a good fit, watch this video!
Deadheading
Keep the blooms coming all summer – deadhead! Flowers are the reproductive organ of a plant; their job is to attract pollinators and create seeds. Once this job is through, the plant will direct its energy to ripening the seed. If it is flowers you want, remove fading blooms to encourage your plant to continue to bloom. This is especially important for the flowering annuals we use for big show, like Geraniums and Petunias, etc. But it still holds true for perennials and shrubs.
Harvesting
Like deadheading, keep harvesting all your summer veggies to keep more coming. Remove the fruit at its peak, before the seeds inside ripen, and your plant will be signaled to keep going.
Summer pruning
Growth vigor of trees and shrubs winds down in July and August. This can be a great time to lightly prune plants that are prone to a vigorous, suckering response. Trees such as Magnolia, Plum, Cherry, Apple, Crabapple, Japanese Maples, Dogwoods, Styrax (this is the short list; there are others) benefit from being thinned and shaped in summer even more than in winter.
Disease control & Insect management
Unlike gardeners, plants can’t go jump in a lake, or retreat to the hammock with a cool beverage when summer just gets to be too much. All the hard work of summer can be hard on a plant. This can leave them vulnerable to insects, fungus and other random ailments. Keeping your plants mulched and watered (and fertilized if needed) is the best way to prevent issues, but sometimes help is needed. Organic controls are always my first line of defense. Insecticidal soap is great for most soft-bodied insect infestations such as aphids and leafhoppers and whitefly. Sluggo is an iron-based slug repellant that is safe for cats, dogs and birds. Organocide, a sodium bicarbonate-based spray, is great for Anthracnose, Black Spot, Powdery Mildew and other diseases. These low-toxicity options are a great place to start. Treat at the first sign of disease.
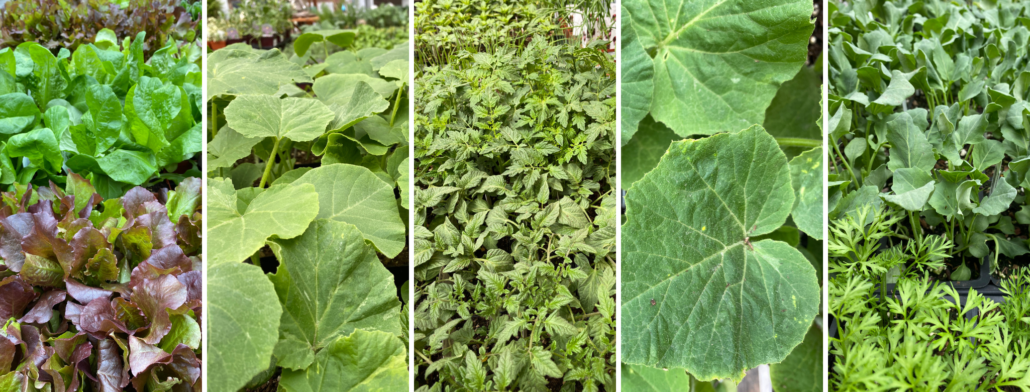
Here in the temperate Pacific Northwest, we have conditions favorable for a lot of great edible plants, but more challenging for others. We can grow cool season veggies like nobody’s business. Peas, lettuces, collards, kale, cabbage, broccoli, brussels sprouts, and the like are made for our weather. We struggle more with veggies that like heat or long growing seasons like tomatoes, corn, melons, and peppers, though they are not impossible, they just require more care and consideration.
Western Washington falls into USDA Hardiness Zones 6-9, so planting recommendations will vary a bit depending on where you are exactly. Here on Whidbey Island, we are in Zone 8b. You can find your Hardiness Zone HERE, this will come in handy for understanding which plants will do best for you and when to plant them based on the temperature range.
The very first thing you will need to do to plant an annual vegetable garden is make sure that you’ve got good soil ready to plant into. Here on Whidbey and much of the PNW we have either very sandy/rocky soil or hard clay soil. Either type will need a lot of amendments to grow vegetables, which generally require a rich, loamy, well-draining soil. If you want to try to make your native soil better, first get a soil test to tell you what you need to add to make it more hospitable. If you would rather avoid the work of building your native soil you can instead create raised beds or garden in pots or planters, using a pre-mixed soil for the purpose of gardening, such as G&B Organic Raised Bed soil. Even with pre-mixed soil you will still want to read up on what you’re planting, as some crops will need more fertility than others, and if you want to continue to use the same soil for many years there are considerations for that as well.
Once you have a place for your plants to live, you can begin to plan what to grow. It is easy to get excited and want to grow a little of everything, trust me! A good strategy for choosing vegetables and other food plants, is to go through your fridge and pantry and find out what it is that your family eats most or finds most enjoyable. It can be a balancing act as well, if you’re limited for space or time in the garden, you’ll have to find what works best for you. My family eats a ton of garlic, onions, leeks, and potatoes. I’ve found that while I can grow garlic and leeks really well, I am not as successful with onions or potatoes in the quantities we would need, so rather than eat up a lot of my garden space I buy onions and potatoes from local farmers who can grow them better and in greater quantities. I can grow zucchini and other squashes enough for our needs, so I prioritize those over broccoli or brussels sprouts, which we love but take up a lot of space and are harder for me to keep pest free. A couple of cherry tomato plants fit nicely into our space, but for my large tomato canning projects I don’t have the space to grow as many as I would need so I opt to buy those as well. Perhaps you have a hard-to-find vegetable or fruit that you love? Maybe you can grow it yourself! We are big fans of hardy kiwi and ground cherries, but these are rarely found at the market, so we grow them. Don’t be afraid to experiment, try out lots of things, some will work great, and some may not, but that will just make next year’s garden a more likely success.
Once you’ve chosen what you want to grow the question becomes, to grow from seed or get starts? I found personally that starts are a great way to get used to gardening, as they are more likely to grow well, and you’ll avoid the pitfalls of seed starting. There are some things that do better from seed, such as carrots, beets, and other root veggies, so if you’re up for the challenge of growing from seed these would be a good place to start. Things like peas and beans do great as well. Some things, like tomatoes, peppers, and melons, which require an early start and a long growing season will have to be transplanted into the garden no matter what, so buying starts is the easiest way to go. But again, if you’re up for the challenge you can read up on starting your own seeds indoors in trays or pots. We’ve got a Video to help you too!
When to plant is the next question that arises. You will need to know the first and last Frost Dates for your region (find yours HERE). Once you know these dates you can plan when you can start planting and calculate when is the latest you can plant based on the length of time your chosen plant takes to grow and ripen. On seed packets or plant labels you’ll see when the best times are to plant them based on frost dates or just a range of dates. For starts you want the “transplant outside” date as opposed to seed starting date. Here is a great Planting Calendar for the PNW from Deep Harvest Farm right here on Whidbey. If you’re unsure, asking local Master Gardeners, nursery staff, or farmers can be helpful. There are lots of groups out there to help gardeners, people love helping others get into gardening!
Finally, you’re ready to plant! Having a few tools such as a small hand shovel, a hori hori, a larger shovel for bigger plants, a garden fork, gloves and a stool or knee pads can be helpful. Most gardeners have their favorites, my trusty garden fork is a go-to for me, as well as the hori hori. Follow instructions for each plant or seed, depth of planting as well as watering are important. Be ready to water regularly throughout the growing season, annual veggies especially need regular water, but not too much, and benefit from soaker hoses or ground level watering if possible, to avoid wetting the plants themselves. The cool, moist PNW weather is a recipe for fungal growth, so giving plants space for airflow and keeping them from getting too wet is important for plant health. Investing in a well-placed, good quality irrigation system can be a huge time saver as well as help to keep plants at their best.
Once your plants are in the ground it’s a matter of keeping them watered, well fed with fertilizer as needed, protecting from pests, and watching for potential health problems. If you’re like me, you’ll check on your little plant babies every day, watching them grow and change. Catching things early is best, so while visiting be sure to watch for pest nibbles, droppings, bugs or slug trails, yellowing or wilting leaves, fuzzy white or grey film, spots or anything that seems abnormal and then treat as necessary. There are lots of strategies for dealing with garden troubles but having an Integrated Pest Management plan can help to address them. WSU has a couple of pages dedicated to helping home gardeners manage common pests. Check out Hortsense for plant problems and weeds, and Pestsense for common indoor pests. Growing your own food at home can be challenging and rewarding. You’ll be getting fresh air, exercise, hands in the dirt, connecting with nature, and eventually fresh, healthy food. For some of you perhaps, this could be the beginning of a lifelong passion. We at Venture Out are here to help you along the way, with tools, plants, seeds, soil, fertilizers, education and advice – Happy Gardening!
If you’d like to start your own seeds in a greenhouse or sunny window, check out this video with Tobey Nelson for detailed instructions!
http://ventureoutnursery.com/wp-content/uploads/2016/03/Final-Logo-1-1.jpg00Callunahttp://ventureoutnursery.com/wp-content/uploads/2016/03/Final-Logo-1-1.jpgCalluna2021-05-05 21:09:522022-12-06 19:49:19Planting a Vegetable Garden in the Pacific Northwest
http://ventureoutnursery.com/wp-content/uploads/2016/03/Final-Logo-1-1.jpg00Tobey Nelsonhttp://ventureoutnursery.com/wp-content/uploads/2016/03/Final-Logo-1-1.jpgTobey Nelson2021-02-19 00:52:212021-04-05 18:37:03How to Prune a Shrub Rose
http://ventureoutnursery.com/wp-content/uploads/2016/03/Final-Logo-1-1.jpg00Tobey Nelsonhttp://ventureoutnursery.com/wp-content/uploads/2016/03/Final-Logo-1-1.jpgTobey Nelson2021-02-19 00:49:012021-04-05 18:41:33How to Prune a Hybrid Tea Rose
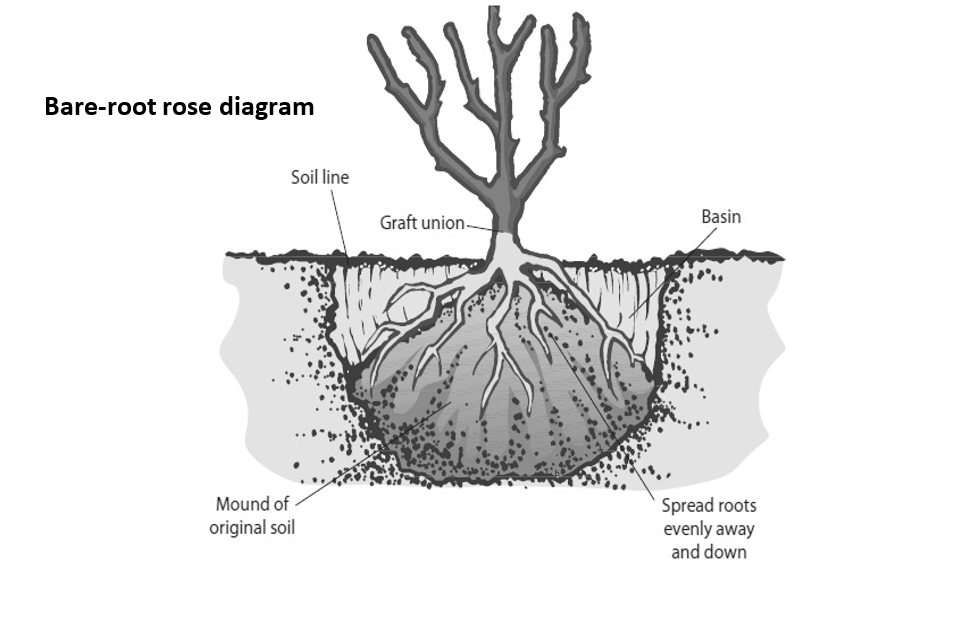
Planting a bare-root Rose is easy! There are just a few tricks you should know. These instructions should help. If you have any questions, stop by the nursery or give us a call!
Remove your rose from the bag, and remove or loosen any tightly-wound tags or stem tapes. Carefully untangle the roots. Trim off any broken roots or branches. Soak the roots in plain, air-temperature water for 2 – 3 hours. Do not allow the roots to dry out, and make sure not to soak for more than 4 hours.
Dig a short, wide hole. It should be as deep as the root zone plus the graft, and be at least twice as wide as the roots. The hole should be wide enough to allow the roots to spread out and to grow outward without crowding. If you dug the hole too deep, put some soil back in and firm it down with your foot to prevent settling.
Using the excavated field soil, make a mound in the center of the hole, firming the soil as you create the mound to avoid settling. Place your plant atop the mound, spreading the roots out evenly down the sides of the mound. Take care that you are not planting too deeply. In the Pacific Northwest, it is not necessary for the knobby graft union is to be below ground level; in our wet climate this can lead to rot. Position the graft knot/crown right at ground level.
Sprinkle a mycorrhizae inoculant over the roots.
Fill the bottom half of the hole with the existing field soil you excavated when you dug the hole. Gently tamp it down.
Generously amend the remaining backfill soil with compost or aged manure, aiming for a one-third amount of compost to field soil. Fill the rest of the hole with this amended soil, again tamping as you go. It should be firmly but not tightly packed. Water generously to help settle the soil around the roots and into the hole. If you notice that your plant is sinking as the soil settles, it is important to gently wiggle and adjust your Rose, according to the guidance above.
After the water has soaked in, spread a protective mulch 2-3 inches deep in a 3-foot diameter area around the base. Leave a 4-inch circle around the base of the plant, so the mulch never touches the trunk. We recommend our Soil Building Conditioner as a mulch.
Protect from deer. Make a “cage” around the rose by inserting 3 evenly-spaced stakes around the plant (ideally 48” tall). Wrap a length of field fence in a circle, securing it to the stakes. Or use the stakes as a framework, and wind wire or fishing line around them. Take care that no wire or plastic is touching or wrapped around the rose. Ensure the fencing is tall enough that deer cannot stick their heads over the fence for a snack of tasty rose shoots. Additionally, it is a great idea to keep newly planted plants well-sprayed with deer repellant sprays – it can help to make a bad first impression with the deer!
Throughout the growing season, give your new rose plenty of water. Deep watering is recommended to help your plant develop a deep root system. Leave the hose on a trickle for 30 minutes or so, making sure that water is soaking the entire root zone. It can be helpful to set a reminder alarm on your cell phone! The goal is to keep the soil moist but not soggy and to allow the soil to drain well between waterings. If you have a spray irrigation system, DO NOT rely on it to provide adequate, deep waterings.
Once your rose has started to bud out, feed with an organic liquid fertilizer every 3 weeks. We recommend Fish Emulsion. New roses are sensitive to root burn from granular fertilizer, esp. non-organic types.
http://ventureoutnursery.com/wp-content/uploads/2016/03/Final-Logo-1-1.jpg00Tobey Nelsonhttp://ventureoutnursery.com/wp-content/uploads/2016/03/Final-Logo-1-1.jpgTobey Nelson2021-01-21 23:14:322024-01-27 21:21:40How to Plant a Bare Root Rose
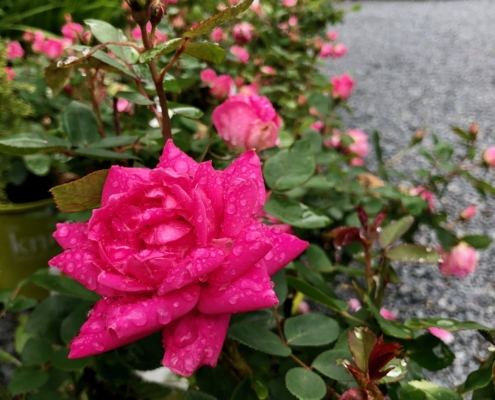
Have you met my friend Rosie? She likes to hang around all day, sunbathing, drinking and eating! She’s a colorful character – and a bit of a Diva! She’s really pretty and usually smells great. But she sure is spoiled! She can sulk if she isn’t getting her way, and she needs fairly regular visits from her personal trainer to keep her in shape!
Ha, ha! Really, Roses are wonderful plants to include in the garden. Almost nothing compares to their scent. The ruffled, voluptuous beauty of a home-grown garden rose is hard to beat. They are surprisingly versatile and hardy plants with a bad reputation for being difficult. If you follow a few “rules”, then you can have success with Roses!
Three main keys to success with Roses: sunlight, water & nutrition
Keeping my friend Rosie in mind, follow these tricks for success with growing Roses in your garden.
Rosie loves to sunbathe. Light is one of the keys to success – Roses need lots of it. Choose a spot with no less than 6 strong hours of sun – more is better. The more light you give your plant, the more disease-free and floriferous it will be.
My friend Rosie lives in a big ol’ mansion on a hill. Soil preparation is key, and drainage is important.
Rosie likes to party – and she’s a bit of a heavy drinker! Give your plant a deep watering at least once a week.
Rosie loves a good meal! Feed your plants regularly. Use organic, granular fertilizers. Synthetic fertilizers can burn the roots of a rose, esp. newly planted ones.
Rosie is a Diva; she doesn’t like competition. Don’t plant your Rose too close to other shrubs, or near established trees. Roses want all the goodness of the soil to themselves.
Rosie needs her space. Roses need good air circulation to keep fungal diseases like powdery mildew and blackspot at bay.
Those are some great basic rules to keep in mind. For more in-depth information to help you grow beautiful roses, keep reading!
Start with good genetics
Set yourself up for success. Choose good varieties. Look for Roses bred for disease resistance and repeat flowering. You can’t overcome weak genetics no matter how hard you work – so why try?!
How to plant a Rose: good soil preparation is key for success
Everything in the garden begins with the soil. While Roses are amazingly tolerant plants, if you take time to really prepare their bed, they will reward you in time with healthy, vigorous growth. These instructions are for a potted Rose. If you are planting a bare root rose, you will want to read this post.
Choose a spot with good drainage and plenty of sunlight.
Dig a big hole. It should be as deep as the root zone plus the graft, and be at least twice as wide as the root ball. The desired depth is to have the knobby graft be about 1” – 2” below the soil height.
Gently slide the Rose from the pot, supporting the root system with your hand. If the root ball is pretty intact, you can place it in the hole. If much of the soil falls away from the roots, then you may want to make a little mound of soil. Firm it gently with your hand. Place the rootball on top. Gently tickle the roots loose, esp. if the plant is rootbound. If the hole you dug is too deep, add some soil back in, and tamp it down gently so the plant doesn’t sink as the soil settles.
Fill the bottom half of the hole with the existing field soil you excavated when you dug the hole. Gently tamp it down.
Amend the remaining soil with compost, aiming for a one-fourth to one-third ratio of compost to field soil. Be more generous with very sandy or very clay soils. Fill the rest of the hole with this amended soil, gently firming the soil as you go.
Water liberally. You may need to let the hose slowly trickle to soak all the surrounding soil.
Spread a 2” layer of mulch around the plant to help suppress weeds and hold water in the soil. Take care not to heap the mulch around the base of the rose, but a shallow layer across the plant is okay. In this way, Roses are different than other plants.
Bonus round: Make sure the surrounding bed is a good host for the Rose – not just the planting hole! Apply 2”-3” of an organic soil amendment – such as our Soil Building Conditioner, Purely Compost or Farmyard Blend – to the whole bed! Use a spading fork to “wiggle” the soil open and get that organic amendment to sift into the existing soil. The goal is to loosen and enrich the soil around the planting hole.
How to protect a Rose from deer
Roses need protection from deer. These cute but pesky critters think Rose buds are bon-bons! To ensure they don’t nibble your plants to nubbins you will need to protect them. If you have a fenced yard for your Rose – perfect! If not, then you will need to protect your plant.
Create a cage. Inserting 3 evenly-spaced stakes around the plant (ideally 48” tall).
Wrap a length of field fence in a circle, securing it to the stakes.
Or use the stakes as a framework, and wind wire or fishing line around them. Take care that no wire or plastic is touching or wrapped around the Rose.
Ensure the fencing is tall enough that deer cannot stick their heads over the fence for a snack of tasty Rose tips.
Cage or not, it is a good idea to keep newly planted plants well-sprayed with deer repellant sprays – it can help to make a bad first impression with the deer!
How to feed a Rose
Roses are heavy feeders. Like a performance athlete, they need a nutritious diet! Here are some tips for making sure your plant has what it needs to stay healthy and flowering well.
Avoid toxic chemicals and synthetic fertilizers such as pesticides. These harsh chemicals can kill microbes and beneficial insects that naturally help a plant. Instead, go organic. These materials are gentler on the plant and the planet and won’t have a negative impact on the soil life.
Ensure soil health. Yearly in early spring (just before or at bud break), after cleaning up any diseased foliage from the ground, mulch with 2” – 4” layer of compost or manure. This suppresses weeds, preserves soil moisture, and helps feed the soil and in turn, your Rose.
When growth begins, apply a granular organic fertilizer. You can’t go wrong with one whose 3 numbers (the NPK) are low and balanced or close to it, like a 4-4-4, or 3-5-2, or even as high as a 10-10-10. Or look for a Rose formulation. Apply according to package directions. Dig it into the soil around the plant, and water in. This last step is particularly important: it delivers the nutrition to the roots, and prevents burned root tips.
There are a few “home remedies” that rose growers employ. These may not be scientifically proven, but they don’t appear harmful. Some find alfalfa meal to be beneficial to Roses. Following package directions, dig this in around the rootzone of the plant. Beware: if you have rabbit problems in your garden you probably don’t want to do this! Bunnies LOVE alfalfa and will be attracted to the scent. Similarly, some folks like to use bone meal to feed their Roses. This can attract dogs and make them want to eat the soil. Another “unproven” recipe is to work in a quarter cup of Epsom salts (magnesium sulphate) during your spring feeding. If you do this be SURE to water well so that salts don’t burn the roots.
Every 3 weeks during the growing season, until August, water with a solution of liquid organic fertilizer. We recommend fish emulsion, or you can use a “bloom” formula.
How to water a Rose
Roses love frequent, deep watering.
Once a week, leave the hose on a trickle for 30-60 minutes to make sure that water is soaking the entire depth of the root zone. It can be helpful to set a reminder alarm on your cell phone! Check the soil between waterings to see if an additional drink is needed. It is okay for the top 2” of soil to dry out if it is moist below that. If not, give another long soak.
Don’t rely on a spray irrigation system to provide adequate, deep watering. These systems are usually programmed to provide more frequent, more shallow water.
Do not wet the foliage when you water. This contributes to disease. Use drip irrigation, or aim your hose low, below the foliage. If you must wet the foliage, such as in a garden with spray head irrigation, do it early in the morning when there is plenty of sunshine and time for the foliage to dry.
How to prevent diseases & pests in Roses
The best way to ensure a disease-free rose is to select disease resistant varieties! Make this a requirement when you are shopping. For 2021, all the Roses we provide here at Venture Out have great disease resistance.
If you have an existing plant that is plagued by disease, consider removing it. Life is short. Choose your battles. Why struggle against week genetics?!
Give your plants room. Don’t plant Roses in a crowded spot, and don’t plant right around them. Air circulation is especially important.
Clean up fallen leaves and petals. Old foliage can harbor spores and bacteria that can infect fresh foliage. Burn or landfill this stuff – don’t compost it. Avoid planting groundcover under your plant to make cleaning up easy.
Remove diseased foliage as soon as you spot it.
Keep the foliage dry. Use drip irrigation, or aim your hose low.
Be proactive. If you know your plant tends to get a disease, begin your prevention regime early in the season. Spray before foliage emerges to kill any spores or bacteria overwintering on the stems. Then spray as the foliage opens to keep it “clean”. Follow the package directions, as some formulations are not safe for tender fresh foliage. Always spray in the early morning with the light is gentle and the temperatures are cool and give plenty of time for the foliage to dry. Late afternoon, with similar conditions, can also be okay.
Aphids love Roses. Remember that these little bugs are a favorite meal of ladybird beetles and other beneficial insects. Often it is enough to simply direct a hard stream of water at them, to knock them to the ground. Do this in the morning so the foliage has time to dry. Alternately, you can smash them with your fingers. Only resort to insecticides if the problem is severe – many of these sprays are indiscriminate and will kill the good guys along with the bad. Try to stick with organic solutions such as insecticidal soap. A remedy for any larger pests you may encounter is to shake the bugs off into a bucket of soapy water, drowning them.
Keep your plants watered & fed so they are strong and able to fight off diseases!
How to maintain a Rose: harvesting, deadheading, and pruning
How you prune your Rose will depend on the type of Rose, the time of year and what your goals are. In late winter, Roses need pruning for shape. In summer, they need harvesting and deadheading. Periodically during the growing season they will need additional intervention to help guide their growth.
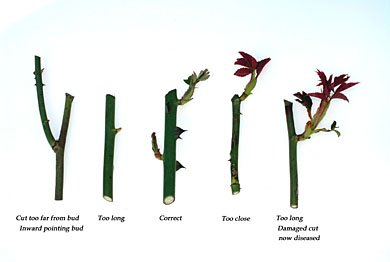
Whenever you prune, use a sharp pair of bypass pruners. Always cut to an outward facing node. Sanitize your tools with rubbing alcohol between cuts and especially between plants to prevent transference of diseases. Cut on a 45 degree angle, with the bud on the high side of the cut. Here is a handy picture from Completegarden.web that shows the proper cut, as well as wrong cuts and why they are bad.
Winter pruning: shape, structure and space
The goal of winter pruning is to restore shape to your Rose, to give it a good structure, and to create space within the branch arrangement. You want to have an open, even arrangement of strong healthy canes. The time to do this work is late in the winter, just as the buds are beginning to swell but before you plant leafs out. A handy reminder date for the Pacific NW is President’s Day.
Remove any dead or broken branches. Remove any diseased or winter-damaged wood.
Remove any suckers from below the graft union. This is the knobby area on the “trunk”, that should be just at the soil line, or slightly below. Often canes from below the graft won’t “match” the rest of the growth.
Prune out any small, spindly growth on the inside.
Prune out any crossing branches, and any branches growing toward the center of the plant.
Prune remaining canes: this is where it really varies among Rose types. For hybrid teas, Grandifloras, and Floribundas, cut back by half to two thirds of the shrub. For shrub roses and ramblers, remove a third of the overall canes (remember that some of the crossing canes that you pruned out in step 4 would count here). You can head them back a bit to give your plant shape, but don’t go crazy like you can with a hybrid tea. For climbers, you may not want to cut them back at all – simply prune out canes until you have a nice open structure.
If there are any remaining old flowers or hips, do deadhead those away.
Summer pruning
The goal of summer pruning is to maintain flowering and vigor!
Deadheading is the removal of spent blooms. This is the key to keep plants flowering. Of course, some Roses only bloom once in their season and no amount of deadheading will help. If you are growing a variety that makes ornamental hips, you would leave some spent blooms to develop that fruit. But for most varieties of modern Roses, removing spent blooms can help with flower production. Prune back to the first leaflet of 5, just above an outward-facing bud.
Maintain health and vigor with continued editing. As puny little stems emerge at the base, remove them so the plant focuses its energy on the strong growth. Remove growth cluttering the center to preserve air flow – this helps keep disease down.
Sometimes a rose will throw out a stupidly long cane. Once it flowers, you can cut it back to a sensible length. For hybrid teas, Grandifloras, and Floribundas, you can cut to half the height of the shrub.
For ramblers and shrub roses, and Roses that only flower once, prune for shape after flowering, a bit like you would in winter.
Cutting for harvest
The sight and scent of a Rose in the home can transform your day! If you like to cut Roses for arranging, follow these steps.
Cut in the morning or evening, when temperatures are cool.
If you can time your harvest to happen a few hours after watering, your blooms will have a longer vase life.
Cut down the stem as deeply as needed for the size vase you plan to use.
Always cut to a 5-leaflet leaf, and to a node with an outward facing bud.
Immediately plunge the stem into tepid water. Increase the vase life of your bloom by making another cut underwater.
Allow the stem to drink and rest for an hour or overnight before arranging.
Remember, we are always here to help support you in your garden. If you have any questions about how to have success with Roses, stop by the nursery or give us a call!
http://ventureoutnursery.com/wp-content/uploads/2016/03/Final-Logo-1-1.jpg00Tobey Nelsonhttp://ventureoutnursery.com/wp-content/uploads/2016/03/Final-Logo-1-1.jpgTobey Nelson2021-01-19 20:27:512023-02-02 17:25:14How to Have Success with Roses