Planting a bare-root Rose is easy! There are just a few tricks you should know. These instructions should help. If you have any questions, stop by the nursery or give us a call!
Remove your rose from the bag, and remove or loosen any tightly-wound tags or stem tapes. Carefully untangle the roots. Trim off any broken roots or branches. Soak the roots in plain, air-temperature water for 2 – 3 hours. Do not allow the roots to dry out, and make sure not to soak for more than 4 hours.
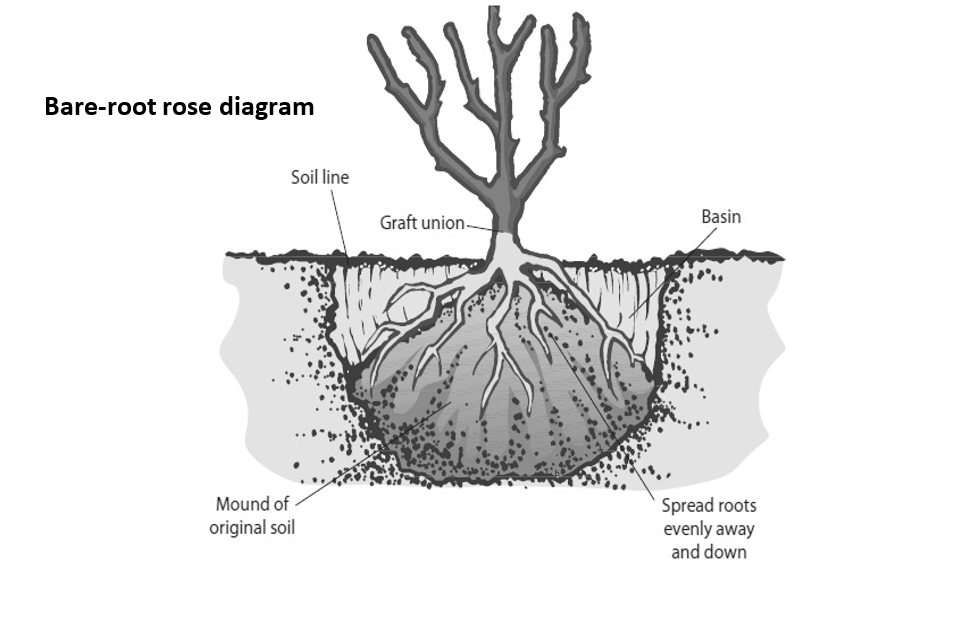
Dig a short, wide hole. It should be as deep as the root zone plus the graft, and be at least twice as wide as the roots. The hole should be wide enough to allow the roots to spread out and to grow outward without crowding. If you dug the hole too deep, put some soil back in and firm it down with your foot to prevent settling.
Using the excavated field soil, make a mound in the center of the hole, firming the soil as you create the mound to avoid settling. Place your plant atop the mound, spreading the roots out evenly down the sides of the mound. Take care that you are not planting too deeply. In the Pacific Northwest, it is not necessary for the knobby graft union is to be below ground level; in our wet climate this can lead to rot. Position the graft knot/crown right at ground level.
Sprinkle a mycorrhizae inoculant over the roots.
Fill the bottom half of the hole with the existing field soil you excavated when you dug the hole. Gently tamp it down.
Generously amend the remaining backfill soil with compost or aged manure, aiming for a one-third amount of compost to field soil. Fill the rest of the hole with this amended soil, again tamping as you go. It should be firmly but not tightly packed. Water generously to help settle the soil around the roots and into the hole. If you notice that your plant is sinking as the soil settles, it is important to gently wiggle and adjust your Rose, according to the guidance above.
After the water has soaked in, spread a protective mulch 2-3 inches deep in a 3-foot diameter area around the base. Leave a 4-inch circle around the base of the plant, so the mulch never touches the trunk. We recommend our Soil Building Conditioner as a mulch.
Protect from deer. Make a “cage” around the rose by inserting 3 evenly-spaced stakes around the plant (ideally 48” tall). Wrap a length of field fence in a circle, securing it to the stakes. Or use the stakes as a framework, and wind wire or fishing line around them. Take care that no wire or plastic is touching or wrapped around the rose. Ensure the fencing is tall enough that deer cannot stick their heads over the fence for a snack of tasty rose shoots. Additionally, it is a great idea to keep newly planted plants well-sprayed with deer repellant sprays – it can help to make a bad first impression with the deer!
Throughout the growing season, give your new rose plenty of water. Deep watering is recommended to help your plant develop a deep root system. Leave the hose on a trickle for 30 minutes or so, making sure that water is soaking the entire root zone. It can be helpful to set a reminder alarm on your cell phone! The goal is to keep the soil moist but not soggy and to allow the soil to drain well between waterings. If you have a spray irrigation system, DO NOT rely on it to provide adequate, deep waterings.
Once your rose has started to bud out, feed with an organic liquid fertilizer every 3 weeks. We recommend Fish Emulsion. New roses are sensitive to root burn from granular fertilizer, esp. non-organic types.
http://ventureoutnursery.com/wp-content/uploads/2016/03/Final-Logo-1-1.jpg00Tobey Nelsonhttp://ventureoutnursery.com/wp-content/uploads/2016/03/Final-Logo-1-1.jpgTobey Nelson2021-01-21 23:14:322024-01-27 21:21:40How to Plant a Bare Root Rose
Have you met my friend Rosie? She likes to hang around all day, sunbathing, drinking and eating! She’s a colorful character – and a bit of a Diva! She’s really pretty and usually smells great. But she sure is spoiled! She can sulk if she isn’t getting her way, and she needs fairly regular visits from her personal trainer to keep her in shape!
Ha, ha! Really, Roses are wonderful plants to include in the garden. Almost nothing compares to their scent. The ruffled, voluptuous beauty of a home-grown garden rose is hard to beat. They are surprisingly versatile and hardy plants with a bad reputation for being difficult. If you follow a few “rules”, then you can have success with Roses!
Three main keys to success with Roses: sunlight, water & nutrition
Keeping my friend Rosie in mind, follow these tricks for success with growing Roses in your garden.
Rosie loves to sunbathe. Light is one of the keys to success – Roses need lots of it. Choose a spot with no less than 6 strong hours of sun – more is better. The more light you give your plant, the more disease-free and floriferous it will be.
My friend Rosie lives in a big ol’ mansion on a hill. Soil preparation is key, and drainage is important.
Rosie likes to party – and she’s a bit of a heavy drinker! Give your plant a deep watering at least once a week.
Rosie loves a good meal! Feed your plants regularly. Use organic, granular fertilizers. Synthetic fertilizers can burn the roots of a rose, esp. newly planted ones.
Rosie is a Diva; she doesn’t like competition. Don’t plant your Rose too close to other shrubs, or near established trees. Roses want all the goodness of the soil to themselves.
Rosie needs her space. Roses need good air circulation to keep fungal diseases like powdery mildew and blackspot at bay.
Those are some great basic rules to keep in mind. For more in-depth information to help you grow beautiful roses, keep reading!
Start with good genetics
Set yourself up for success. Choose good varieties. Look for Roses bred for disease resistance and repeat flowering. You can’t overcome weak genetics no matter how hard you work – so why try?!
How to plant a Rose: good soil preparation is key for success
Everything in the garden begins with the soil. While Roses are amazingly tolerant plants, if you take time to really prepare their bed, they will reward you in time with healthy, vigorous growth. These instructions are for a potted Rose. If you are planting a bare root rose, you will want to read this post.
Choose a spot with good drainage and plenty of sunlight.
Dig a big hole. It should be as deep as the root zone plus the graft, and be at least twice as wide as the root ball. The desired depth is to have the knobby graft be about 1” – 2” below the soil height.
Gently slide the Rose from the pot, supporting the root system with your hand. If the root ball is pretty intact, you can place it in the hole. If much of the soil falls away from the roots, then you may want to make a little mound of soil. Firm it gently with your hand. Place the rootball on top. Gently tickle the roots loose, esp. if the plant is rootbound. If the hole you dug is too deep, add some soil back in, and tamp it down gently so the plant doesn’t sink as the soil settles.
Fill the bottom half of the hole with the existing field soil you excavated when you dug the hole. Gently tamp it down.
Amend the remaining soil with compost, aiming for a one-fourth to one-third ratio of compost to field soil. Be more generous with very sandy or very clay soils. Fill the rest of the hole with this amended soil, gently firming the soil as you go.
Water liberally. You may need to let the hose slowly trickle to soak all the surrounding soil.
Spread a 2” layer of mulch around the plant to help suppress weeds and hold water in the soil. Take care not to heap the mulch around the base of the rose, but a shallow layer across the plant is okay. In this way, Roses are different than other plants.
Bonus round: Make sure the surrounding bed is a good host for the Rose – not just the planting hole! Apply 2”-3” of an organic soil amendment – such as our Soil Building Conditioner, Purely Compost or Farmyard Blend – to the whole bed! Use a spading fork to “wiggle” the soil open and get that organic amendment to sift into the existing soil. The goal is to loosen and enrich the soil around the planting hole.
How to protect a Rose from deer
Roses need protection from deer. These cute but pesky critters think Rose buds are bon-bons! To ensure they don’t nibble your plants to nubbins you will need to protect them. If you have a fenced yard for your Rose – perfect! If not, then you will need to protect your plant.
Create a cage. Inserting 3 evenly-spaced stakes around the plant (ideally 48” tall).
Wrap a length of field fence in a circle, securing it to the stakes.
Or use the stakes as a framework, and wind wire or fishing line around them. Take care that no wire or plastic is touching or wrapped around the Rose.
Ensure the fencing is tall enough that deer cannot stick their heads over the fence for a snack of tasty Rose tips.
Cage or not, it is a good idea to keep newly planted plants well-sprayed with deer repellant sprays – it can help to make a bad first impression with the deer!
How to feed a Rose
Roses are heavy feeders. Like a performance athlete, they need a nutritious diet! Here are some tips for making sure your plant has what it needs to stay healthy and flowering well.
Avoid toxic chemicals and synthetic fertilizers such as pesticides. These harsh chemicals can kill microbes and beneficial insects that naturally help a plant. Instead, go organic. These materials are gentler on the plant and the planet and won’t have a negative impact on the soil life.
Ensure soil health. Yearly in early spring (just before or at bud break), after cleaning up any diseased foliage from the ground, mulch with 2” – 4” layer of compost or manure. This suppresses weeds, preserves soil moisture, and helps feed the soil and in turn, your Rose.
When growth begins, apply a granular organic fertilizer. You can’t go wrong with one whose 3 numbers (the NPK) are low and balanced or close to it, like a 4-4-4, or 3-5-2, or even as high as a 10-10-10. Or look for a Rose formulation. Apply according to package directions. Dig it into the soil around the plant, and water in. This last step is particularly important: it delivers the nutrition to the roots, and prevents burned root tips.
There are a few “home remedies” that rose growers employ. These may not be scientifically proven, but they don’t appear harmful. Some find alfalfa meal to be beneficial to Roses. Following package directions, dig this in around the rootzone of the plant. Beware: if you have rabbit problems in your garden you probably don’t want to do this! Bunnies LOVE alfalfa and will be attracted to the scent. Similarly, some folks like to use bone meal to feed their Roses. This can attract dogs and make them want to eat the soil. Another “unproven” recipe is to work in a quarter cup of Epsom salts (magnesium sulphate) during your spring feeding. If you do this be SURE to water well so that salts don’t burn the roots.
Every 3 weeks during the growing season, until August, water with a solution of liquid organic fertilizer. We recommend fish emulsion, or you can use a “bloom” formula.
How to water a Rose
Roses love frequent, deep watering.
Once a week, leave the hose on a trickle for 30-60 minutes to make sure that water is soaking the entire depth of the root zone. It can be helpful to set a reminder alarm on your cell phone! Check the soil between waterings to see if an additional drink is needed. It is okay for the top 2” of soil to dry out if it is moist below that. If not, give another long soak.
Don’t rely on a spray irrigation system to provide adequate, deep watering. These systems are usually programmed to provide more frequent, more shallow water.
Do not wet the foliage when you water. This contributes to disease. Use drip irrigation, or aim your hose low, below the foliage. If you must wet the foliage, such as in a garden with spray head irrigation, do it early in the morning when there is plenty of sunshine and time for the foliage to dry.
How to prevent diseases & pests in Roses
The best way to ensure a disease-free rose is to select disease resistant varieties! Make this a requirement when you are shopping. For 2021, all the Roses we provide here at Venture Out have great disease resistance.
If you have an existing plant that is plagued by disease, consider removing it. Life is short. Choose your battles. Why struggle against week genetics?!
Give your plants room. Don’t plant Roses in a crowded spot, and don’t plant right around them. Air circulation is especially important.
Clean up fallen leaves and petals. Old foliage can harbor spores and bacteria that can infect fresh foliage. Burn or landfill this stuff – don’t compost it. Avoid planting groundcover under your plant to make cleaning up easy.
Remove diseased foliage as soon as you spot it.
Keep the foliage dry. Use drip irrigation, or aim your hose low.
Be proactive. If you know your plant tends to get a disease, begin your prevention regime early in the season. Spray before foliage emerges to kill any spores or bacteria overwintering on the stems. Then spray as the foliage opens to keep it “clean”. Follow the package directions, as some formulations are not safe for tender fresh foliage. Always spray in the early morning with the light is gentle and the temperatures are cool and give plenty of time for the foliage to dry. Late afternoon, with similar conditions, can also be okay.
Aphids love Roses. Remember that these little bugs are a favorite meal of ladybird beetles and other beneficial insects. Often it is enough to simply direct a hard stream of water at them, to knock them to the ground. Do this in the morning so the foliage has time to dry. Alternately, you can smash them with your fingers. Only resort to insecticides if the problem is severe – many of these sprays are indiscriminate and will kill the good guys along with the bad. Try to stick with organic solutions such as insecticidal soap. A remedy for any larger pests you may encounter is to shake the bugs off into a bucket of soapy water, drowning them.
Keep your plants watered & fed so they are strong and able to fight off diseases!
How to maintain a Rose: harvesting, deadheading, and pruning
How you prune your Rose will depend on the type of Rose, the time of year and what your goals are. In late winter, Roses need pruning for shape. In summer, they need harvesting and deadheading. Periodically during the growing season they will need additional intervention to help guide their growth.
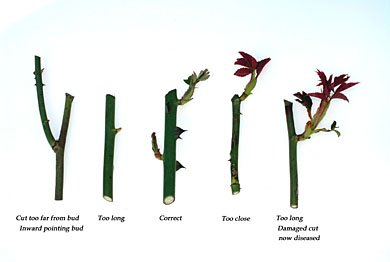
Whenever you prune, use a sharp pair of bypass pruners. Always cut to an outward facing node. Sanitize your tools with rubbing alcohol between cuts and especially between plants to prevent transference of diseases. Cut on a 45 degree angle, with the bud on the high side of the cut. Here is a handy picture from Completegarden.web that shows the proper cut, as well as wrong cuts and why they are bad.
Winter pruning: shape, structure and space
The goal of winter pruning is to restore shape to your Rose, to give it a good structure, and to create space within the branch arrangement. You want to have an open, even arrangement of strong healthy canes. The time to do this work is late in the winter, just as the buds are beginning to swell but before you plant leafs out. A handy reminder date for the Pacific NW is President’s Day.
Remove any dead or broken branches. Remove any diseased or winter-damaged wood.
Remove any suckers from below the graft union. This is the knobby area on the “trunk”, that should be just at the soil line, or slightly below. Often canes from below the graft won’t “match” the rest of the growth.
Prune out any small, spindly growth on the inside.
Prune out any crossing branches, and any branches growing toward the center of the plant.
Prune remaining canes: this is where it really varies among Rose types. For hybrid teas, Grandifloras, and Floribundas, cut back by half to two thirds of the shrub. For shrub roses and ramblers, remove a third of the overall canes (remember that some of the crossing canes that you pruned out in step 4 would count here). You can head them back a bit to give your plant shape, but don’t go crazy like you can with a hybrid tea. For climbers, you may not want to cut them back at all – simply prune out canes until you have a nice open structure.
If there are any remaining old flowers or hips, do deadhead those away.
Summer pruning
The goal of summer pruning is to maintain flowering and vigor!
Deadheading is the removal of spent blooms. This is the key to keep plants flowering. Of course, some Roses only bloom once in their season and no amount of deadheading will help. If you are growing a variety that makes ornamental hips, you would leave some spent blooms to develop that fruit. But for most varieties of modern Roses, removing spent blooms can help with flower production. Prune back to the first leaflet of 5, just above an outward-facing bud.
Maintain health and vigor with continued editing. As puny little stems emerge at the base, remove them so the plant focuses its energy on the strong growth. Remove growth cluttering the center to preserve air flow – this helps keep disease down.
Sometimes a rose will throw out a stupidly long cane. Once it flowers, you can cut it back to a sensible length. For hybrid teas, Grandifloras, and Floribundas, you can cut to half the height of the shrub.
For ramblers and shrub roses, and Roses that only flower once, prune for shape after flowering, a bit like you would in winter.
Cutting for harvest
The sight and scent of a Rose in the home can transform your day! If you like to cut Roses for arranging, follow these steps.
Cut in the morning or evening, when temperatures are cool.
If you can time your harvest to happen a few hours after watering, your blooms will have a longer vase life.
Cut down the stem as deeply as needed for the size vase you plan to use.
Always cut to a 5-leaflet leaf, and to a node with an outward facing bud.
Immediately plunge the stem into tepid water. Increase the vase life of your bloom by making another cut underwater.
Allow the stem to drink and rest for an hour or overnight before arranging.
Remember, we are always here to help support you in your garden. If you have any questions about how to have success with Roses, stop by the nursery or give us a call!
http://ventureoutnursery.com/wp-content/uploads/2016/03/Final-Logo-1-1.jpg00Tobey Nelsonhttp://ventureoutnursery.com/wp-content/uploads/2016/03/Final-Logo-1-1.jpgTobey Nelson2021-01-19 20:27:512023-02-02 17:25:14How to Have Success with Roses
We gardeners are stewards of the earth. We share our garden not only with plants, but with the many critters that depend on them. This includes pollinators! Many species of insects and birds act as pollinators, including hummingbirds, bees, hoverflies, moths & butterflies, and more. Since pollinators are inextricably linked to food security (so many of the foods we eat require pollination, such as all fruits, beans, squashes and more), we should all be concerned about their health. Many of the choices we make as gardeners can support these creatures. Here are a few simple ways that you can help your local pollinators.
Winter-flowering plants provide food for pollinators
One of the most fun ways to help local populations of pollinators is to include winter-flowering plants in your garden. Though most of these insects hibernate during the cold temperatures, they can awaken and become active on warm days. Having a nectar source is important; it provides nourishment to them. Cheer yourself and feed these little friends with some of these winter flowers. Planting in groups can make it easier for these winged friends to find this food.
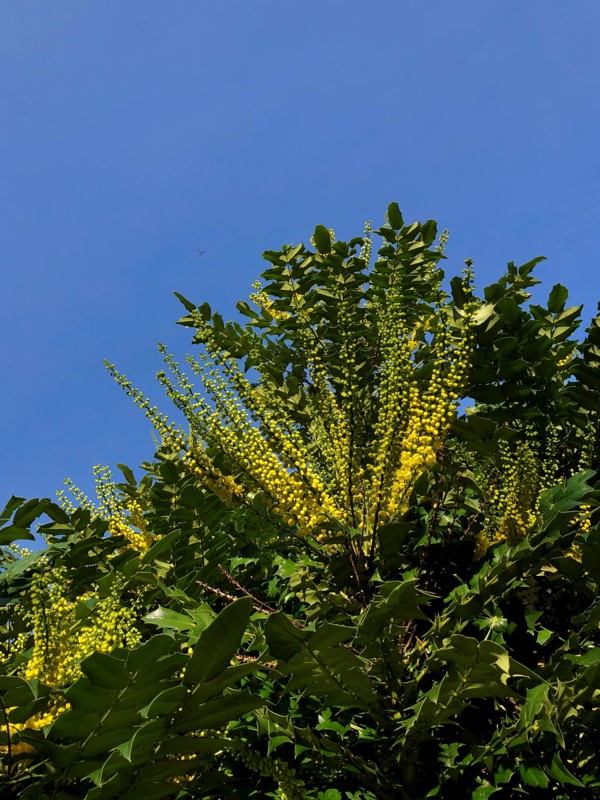
Mahonia
There are several species of Mahonia, or Oregon Grape, that you can plant in your garden. Pictured is the large evergreen shrub Mahonia x media, which is the earliest to flower. No garden should be without one! Their bright yellow flowers in December thru February are loved by hummingbirds and gardeners alike. The best part for Whidbey Island gardeners is that the deer do not love this plant!
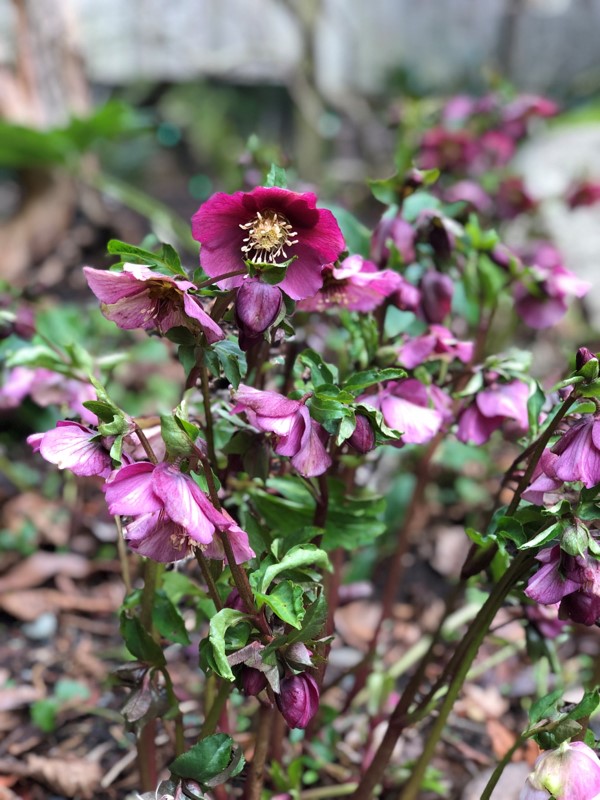
Hellebore
How about another indispensable garden plant?! This easy-to-grow evergreen perennial brings cheer and nectar with its blooms, from December through March in shades of white, cream, pink, red and even black! Another early flowering perennial worth including is Pasque Flower (Pulsatilla vulgaris).
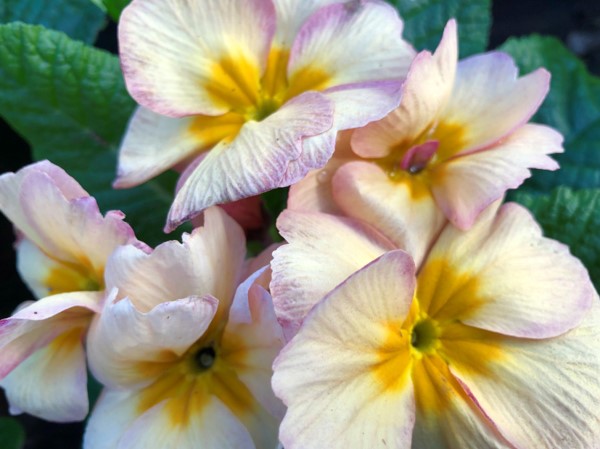
Primrose
These delightful perennial plants can be tucked in many little spots in the garden. Use them in beds as a groundcover or between deciduous perennials, or plant in pots for a spot of winter and early spring cheer. Other plants like this to include would be Cyclamen & Pansies.
Heather
Here’s a true work-horse plant! Heathers and Heaths offer evergreen interest – especially if you choose a variety with golden or silver foliage – as well as flowers from fall through spring. These are drought tolerant and deer-resistant!
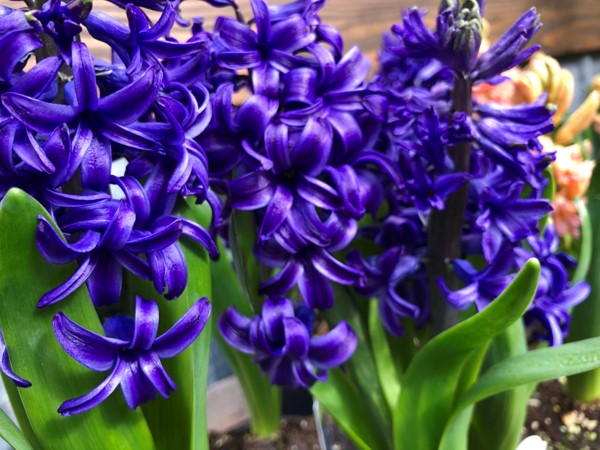
Winter & spring flowering bulbs
We can’t overlook the contribution that winter & spring flowering bulbs make to the pollinator menu. Well known blooms such as Crocus, Muscari, Dutch Hyacinth as well as lesser-known ones like Snowdrop (Galanthus) and Winter Aconite are fun to include in the garden and offer nectar as well.
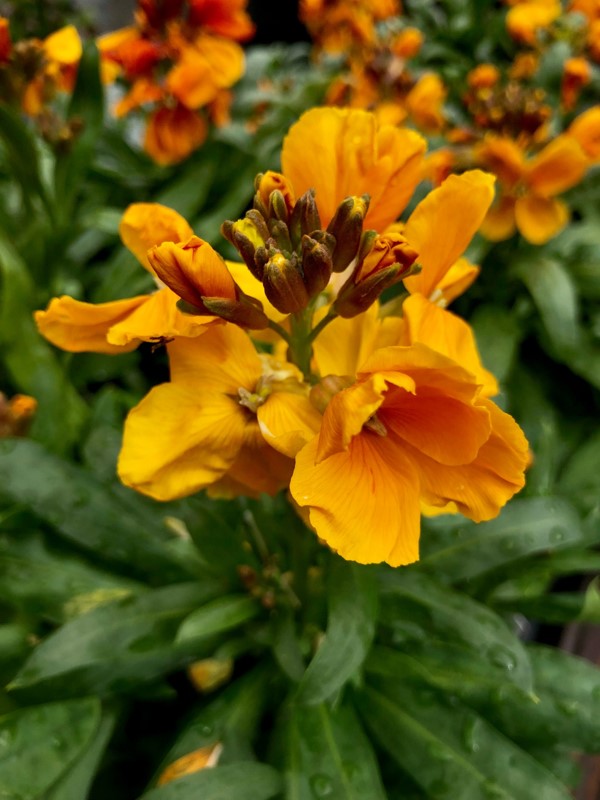
Erysimum
Deliciously fragrant Wallflower (Erysimum) is a treat for the nose as well as the pollinators. These sun-loving, drought- and deer-tolerant semi-evergreen perennials are great for early color in the garden.
Other plants that are not pictured that are great sources of nectar include early flowering trees & shrubs, such as Witch Hazel, Forsythia, Cherries, Plums, Strawberry Trees (Arbutus), Abelia, Daphne, Cornelian Cherry (Cornus mas), Hebe and others.
A “messy garden” is okay with pollinators!
It is okay with many of these creatures if you aren’t a tidy gardener. “Messy gardens” can offer food and shelter. Plants that you didn’t deadhead can throw off the random bloom in the winter, offering a meal to any nectar-lovers flying by.
Loss of habitat is a leading reason for pollinator decline. Our gardens can help offset that loss. Random garden debris, such as leaf litter, spent stems, and curled up bits of bark and branches, offers shelter and nesting spots for overwintering insects. Give yourself a break and help your garden buddies. Instead of raking every bit of debris up, leave a layer of litter and debris in place to compost and to provide this needed habitat.
Only use organic chemicals in your garden
One of the major reasons pollinator populations are in decline across the globe is exposure to harmful chemicals. Make your garden a safe place for bird and insect life (and in turn, many other forms of life) by avoiding toxic chemicals such as Weed and Feed, Preen, Nicotine-based sprays (aka neo-nicotenoids) and other insect killers.