http://ventureoutnursery.com/wp-content/uploads/2016/03/Final-Logo-1-1.jpg00Tobey Nelsonhttp://ventureoutnursery.com/wp-content/uploads/2016/03/Final-Logo-1-1.jpgTobey Nelson2021-02-19 00:52:212021-04-05 18:37:03How to Prune a Shrub Rose
http://ventureoutnursery.com/wp-content/uploads/2016/03/Final-Logo-1-1.jpg00Tobey Nelsonhttp://ventureoutnursery.com/wp-content/uploads/2016/03/Final-Logo-1-1.jpgTobey Nelson2021-02-19 00:49:012021-04-05 18:41:33How to Prune a Hybrid Tea Rose
This everbearing strawberry produces large, soft, deliciously sweet fruits that are great for eating fresh and for making preserves. Quinault produces from late spring through fall.
Hood
A June bearing strawberry that produces medium, sweet, and juicy berries that are known for their high sugar content. Great for eating, preserves and freezing for mid-winter treats.
Rainier
This June bearing has delicious fruit that are disease resistant. Easy to grow, these plants have attractive foliage. Produces soft, large berries that are great fresh or processed.
Shuksan
This June bearing strawberry produces large, firm berries that are great for fresh eating and excellent for freezing and for preserves. Plants are hardy to -20 F.
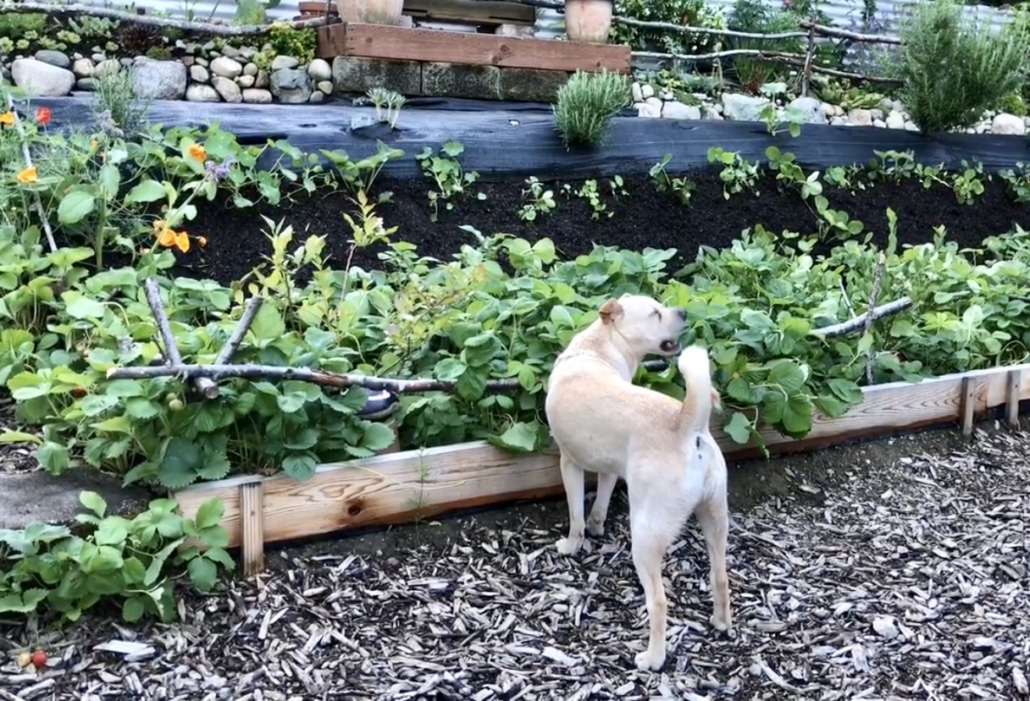
Regardless of the variety, many Strawberries are loved by (and safe for) dogs!!
http://ventureoutnursery.com/wp-content/uploads/2016/03/Final-Logo-1-1.jpg00Jennifer Ann Reetzhttp://ventureoutnursery.com/wp-content/uploads/2016/03/Final-Logo-1-1.jpgJennifer Ann Reetz2021-02-11 21:41:112023-08-16 21:08:12Strawberries 2021
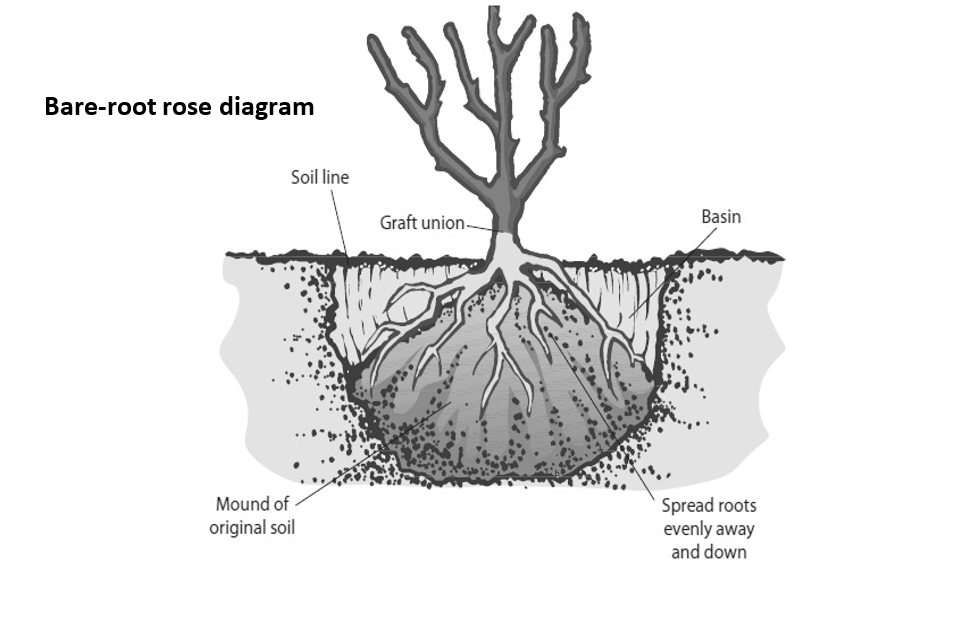
Planting a bare-root Rose is easy! There are just a few tricks you should know. These instructions should help. If you have any questions, stop by the nursery or give us a call!
Remove your rose from the bag, and remove or loosen any tightly-wound tags or stem tapes. Carefully untangle the roots. Trim off any broken roots or branches. Soak the roots in plain, air-temperature water for 2 – 3 hours. Do not allow the roots to dry out, and make sure not to soak for more than 4 hours.
Dig a short, wide hole. It should be as deep as the root zone plus the graft, and be at least twice as wide as the roots. The hole should be wide enough to allow the roots to spread out and to grow outward without crowding. If you dug the hole too deep, put some soil back in and firm it down with your foot to prevent settling.
Using the excavated field soil, make a mound in the center of the hole, firming the soil as you create the mound to avoid settling. Place your plant atop the mound, spreading the roots out evenly down the sides of the mound. Take care that you are not planting too deeply. In the Pacific Northwest, it is not necessary for the knobby graft union is to be below ground level; in our wet climate this can lead to rot. Position the graft knot/crown right at ground level.
Sprinkle a mycorrhizae inoculant over the roots.
Fill the bottom half of the hole with the existing field soil you excavated when you dug the hole. Gently tamp it down.
Generously amend the remaining backfill soil with compost or aged manure, aiming for a one-third amount of compost to field soil. Fill the rest of the hole with this amended soil, again tamping as you go. It should be firmly but not tightly packed. Water generously to help settle the soil around the roots and into the hole. If you notice that your plant is sinking as the soil settles, it is important to gently wiggle and adjust your Rose, according to the guidance above.
After the water has soaked in, spread a protective mulch 2-3 inches deep in a 3-foot diameter area around the base. Leave a 4-inch circle around the base of the plant, so the mulch never touches the trunk. We recommend our Soil Building Conditioner as a mulch.
Protect from deer. Make a “cage” around the rose by inserting 3 evenly-spaced stakes around the plant (ideally 48” tall). Wrap a length of field fence in a circle, securing it to the stakes. Or use the stakes as a framework, and wind wire or fishing line around them. Take care that no wire or plastic is touching or wrapped around the rose. Ensure the fencing is tall enough that deer cannot stick their heads over the fence for a snack of tasty rose shoots. Additionally, it is a great idea to keep newly planted plants well-sprayed with deer repellant sprays – it can help to make a bad first impression with the deer!
Throughout the growing season, give your new rose plenty of water. Deep watering is recommended to help your plant develop a deep root system. Leave the hose on a trickle for 30 minutes or so, making sure that water is soaking the entire root zone. It can be helpful to set a reminder alarm on your cell phone! The goal is to keep the soil moist but not soggy and to allow the soil to drain well between waterings. If you have a spray irrigation system, DO NOT rely on it to provide adequate, deep waterings.
Once your rose has started to bud out, feed with an organic liquid fertilizer every 3 weeks. We recommend Fish Emulsion. New roses are sensitive to root burn from granular fertilizer, esp. non-organic types.
http://ventureoutnursery.com/wp-content/uploads/2016/03/Final-Logo-1-1.jpg00Tobey Nelsonhttp://ventureoutnursery.com/wp-content/uploads/2016/03/Final-Logo-1-1.jpgTobey Nelson2021-01-21 23:14:322024-01-27 21:21:40How to Plant a Bare Root Rose
Have you met my friend Rosie? She likes to hang around all day, sunbathing, drinking and eating! She’s a colorful character – and a bit of a Diva! She’s really pretty and usually smells great. But she sure is spoiled! She can sulk if she isn’t getting her way, and she needs fairly regular visits from her personal trainer to keep her in shape!
Ha, ha! Really, Roses are wonderful plants to include in the garden. Almost nothing compares to their scent. The ruffled, voluptuous beauty of a home-grown garden rose is hard to beat. They are surprisingly versatile and hardy plants with a bad reputation for being difficult. If you follow a few “rules”, then you can have success with Roses!
Three main keys to success with Roses: sunlight, water & nutrition
Keeping my friend Rosie in mind, follow these tricks for success with growing Roses in your garden.
Rosie loves to sunbathe. Light is one of the keys to success – Roses need lots of it. Choose a spot with no less than 6 strong hours of sun – more is better. The more light you give your plant, the more disease-free and floriferous it will be.
My friend Rosie lives in a big ol’ mansion on a hill. Soil preparation is key, and drainage is important.
Rosie likes to party – and she’s a bit of a heavy drinker! Give your plant a deep watering at least once a week.
Rosie loves a good meal! Feed your plants regularly. Use organic, granular fertilizers. Synthetic fertilizers can burn the roots of a rose, esp. newly planted ones.
Rosie is a Diva; she doesn’t like competition. Don’t plant your Rose too close to other shrubs, or near established trees. Roses want all the goodness of the soil to themselves.
Rosie needs her space. Roses need good air circulation to keep fungal diseases like powdery mildew and blackspot at bay.
Those are some great basic rules to keep in mind. For more in-depth information to help you grow beautiful roses, keep reading!
Start with good genetics
Set yourself up for success. Choose good varieties. Look for Roses bred for disease resistance and repeat flowering. You can’t overcome weak genetics no matter how hard you work – so why try?!
How to plant a Rose: good soil preparation is key for success
Everything in the garden begins with the soil. While Roses are amazingly tolerant plants, if you take time to really prepare their bed, they will reward you in time with healthy, vigorous growth. These instructions are for a potted Rose. If you are planting a bare root rose, you will want to read this post.
Choose a spot with good drainage and plenty of sunlight.
Dig a big hole. It should be as deep as the root zone plus the graft, and be at least twice as wide as the root ball. The desired depth is to have the knobby graft be about 1” – 2” below the soil height.
Gently slide the Rose from the pot, supporting the root system with your hand. If the root ball is pretty intact, you can place it in the hole. If much of the soil falls away from the roots, then you may want to make a little mound of soil. Firm it gently with your hand. Place the rootball on top. Gently tickle the roots loose, esp. if the plant is rootbound. If the hole you dug is too deep, add some soil back in, and tamp it down gently so the plant doesn’t sink as the soil settles.
Fill the bottom half of the hole with the existing field soil you excavated when you dug the hole. Gently tamp it down.
Amend the remaining soil with compost, aiming for a one-fourth to one-third ratio of compost to field soil. Be more generous with very sandy or very clay soils. Fill the rest of the hole with this amended soil, gently firming the soil as you go.
Water liberally. You may need to let the hose slowly trickle to soak all the surrounding soil.
Spread a 2” layer of mulch around the plant to help suppress weeds and hold water in the soil. Take care not to heap the mulch around the base of the rose, but a shallow layer across the plant is okay. In this way, Roses are different than other plants.
Bonus round: Make sure the surrounding bed is a good host for the Rose – not just the planting hole! Apply 2”-3” of an organic soil amendment – such as our Soil Building Conditioner, Purely Compost or Farmyard Blend – to the whole bed! Use a spading fork to “wiggle” the soil open and get that organic amendment to sift into the existing soil. The goal is to loosen and enrich the soil around the planting hole.
How to protect a Rose from deer
Roses need protection from deer. These cute but pesky critters think Rose buds are bon-bons! To ensure they don’t nibble your plants to nubbins you will need to protect them. If you have a fenced yard for your Rose – perfect! If not, then you will need to protect your plant.
Create a cage. Inserting 3 evenly-spaced stakes around the plant (ideally 48” tall).
Wrap a length of field fence in a circle, securing it to the stakes.
Or use the stakes as a framework, and wind wire or fishing line around them. Take care that no wire or plastic is touching or wrapped around the Rose.
Ensure the fencing is tall enough that deer cannot stick their heads over the fence for a snack of tasty Rose tips.
Cage or not, it is a good idea to keep newly planted plants well-sprayed with deer repellant sprays – it can help to make a bad first impression with the deer!
How to feed a Rose
Roses are heavy feeders. Like a performance athlete, they need a nutritious diet! Here are some tips for making sure your plant has what it needs to stay healthy and flowering well.
Avoid toxic chemicals and synthetic fertilizers such as pesticides. These harsh chemicals can kill microbes and beneficial insects that naturally help a plant. Instead, go organic. These materials are gentler on the plant and the planet and won’t have a negative impact on the soil life.
Ensure soil health. Yearly in early spring (just before or at bud break), after cleaning up any diseased foliage from the ground, mulch with 2” – 4” layer of compost or manure. This suppresses weeds, preserves soil moisture, and helps feed the soil and in turn, your Rose.
When growth begins, apply a granular organic fertilizer. You can’t go wrong with one whose 3 numbers (the NPK) are low and balanced or close to it, like a 4-4-4, or 3-5-2, or even as high as a 10-10-10. Or look for a Rose formulation. Apply according to package directions. Dig it into the soil around the plant, and water in. This last step is particularly important: it delivers the nutrition to the roots, and prevents burned root tips.
There are a few “home remedies” that rose growers employ. These may not be scientifically proven, but they don’t appear harmful. Some find alfalfa meal to be beneficial to Roses. Following package directions, dig this in around the rootzone of the plant. Beware: if you have rabbit problems in your garden you probably don’t want to do this! Bunnies LOVE alfalfa and will be attracted to the scent. Similarly, some folks like to use bone meal to feed their Roses. This can attract dogs and make them want to eat the soil. Another “unproven” recipe is to work in a quarter cup of Epsom salts (magnesium sulphate) during your spring feeding. If you do this be SURE to water well so that salts don’t burn the roots.
Every 3 weeks during the growing season, until August, water with a solution of liquid organic fertilizer. We recommend fish emulsion, or you can use a “bloom” formula.
How to water a Rose
Roses love frequent, deep watering.
Once a week, leave the hose on a trickle for 30-60 minutes to make sure that water is soaking the entire depth of the root zone. It can be helpful to set a reminder alarm on your cell phone! Check the soil between waterings to see if an additional drink is needed. It is okay for the top 2” of soil to dry out if it is moist below that. If not, give another long soak.
Don’t rely on a spray irrigation system to provide adequate, deep watering. These systems are usually programmed to provide more frequent, more shallow water.
Do not wet the foliage when you water. This contributes to disease. Use drip irrigation, or aim your hose low, below the foliage. If you must wet the foliage, such as in a garden with spray head irrigation, do it early in the morning when there is plenty of sunshine and time for the foliage to dry.
How to prevent diseases & pests in Roses
The best way to ensure a disease-free rose is to select disease resistant varieties! Make this a requirement when you are shopping. For 2021, all the Roses we provide here at Venture Out have great disease resistance.
If you have an existing plant that is plagued by disease, consider removing it. Life is short. Choose your battles. Why struggle against week genetics?!
Give your plants room. Don’t plant Roses in a crowded spot, and don’t plant right around them. Air circulation is especially important.
Clean up fallen leaves and petals. Old foliage can harbor spores and bacteria that can infect fresh foliage. Burn or landfill this stuff – don’t compost it. Avoid planting groundcover under your plant to make cleaning up easy.
Remove diseased foliage as soon as you spot it.
Keep the foliage dry. Use drip irrigation, or aim your hose low.
Be proactive. If you know your plant tends to get a disease, begin your prevention regime early in the season. Spray before foliage emerges to kill any spores or bacteria overwintering on the stems. Then spray as the foliage opens to keep it “clean”. Follow the package directions, as some formulations are not safe for tender fresh foliage. Always spray in the early morning with the light is gentle and the temperatures are cool and give plenty of time for the foliage to dry. Late afternoon, with similar conditions, can also be okay.
Aphids love Roses. Remember that these little bugs are a favorite meal of ladybird beetles and other beneficial insects. Often it is enough to simply direct a hard stream of water at them, to knock them to the ground. Do this in the morning so the foliage has time to dry. Alternately, you can smash them with your fingers. Only resort to insecticides if the problem is severe – many of these sprays are indiscriminate and will kill the good guys along with the bad. Try to stick with organic solutions such as insecticidal soap. A remedy for any larger pests you may encounter is to shake the bugs off into a bucket of soapy water, drowning them.
Keep your plants watered & fed so they are strong and able to fight off diseases!
How to maintain a Rose: harvesting, deadheading, and pruning
How you prune your Rose will depend on the type of Rose, the time of year and what your goals are. In late winter, Roses need pruning for shape. In summer, they need harvesting and deadheading. Periodically during the growing season they will need additional intervention to help guide their growth.
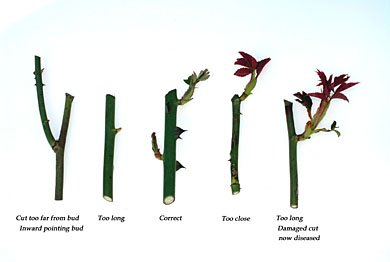
Whenever you prune, use a sharp pair of bypass pruners. Always cut to an outward facing node. Sanitize your tools with rubbing alcohol between cuts and especially between plants to prevent transference of diseases. Cut on a 45 degree angle, with the bud on the high side of the cut. Here is a handy picture from Completegarden.web that shows the proper cut, as well as wrong cuts and why they are bad.
Winter pruning: shape, structure and space
The goal of winter pruning is to restore shape to your Rose, to give it a good structure, and to create space within the branch arrangement. You want to have an open, even arrangement of strong healthy canes. The time to do this work is late in the winter, just as the buds are beginning to swell but before you plant leafs out. A handy reminder date for the Pacific NW is President’s Day.
Remove any dead or broken branches. Remove any diseased or winter-damaged wood.
Remove any suckers from below the graft union. This is the knobby area on the “trunk”, that should be just at the soil line, or slightly below. Often canes from below the graft won’t “match” the rest of the growth.
Prune out any small, spindly growth on the inside.
Prune out any crossing branches, and any branches growing toward the center of the plant.
Prune remaining canes: this is where it really varies among Rose types. For hybrid teas, Grandifloras, and Floribundas, cut back by half to two thirds of the shrub. For shrub roses and ramblers, remove a third of the overall canes (remember that some of the crossing canes that you pruned out in step 4 would count here). You can head them back a bit to give your plant shape, but don’t go crazy like you can with a hybrid tea. For climbers, you may not want to cut them back at all – simply prune out canes until you have a nice open structure.
If there are any remaining old flowers or hips, do deadhead those away.
Summer pruning
The goal of summer pruning is to maintain flowering and vigor!
Deadheading is the removal of spent blooms. This is the key to keep plants flowering. Of course, some Roses only bloom once in their season and no amount of deadheading will help. If you are growing a variety that makes ornamental hips, you would leave some spent blooms to develop that fruit. But for most varieties of modern Roses, removing spent blooms can help with flower production. Prune back to the first leaflet of 5, just above an outward-facing bud.
Maintain health and vigor with continued editing. As puny little stems emerge at the base, remove them so the plant focuses its energy on the strong growth. Remove growth cluttering the center to preserve air flow – this helps keep disease down.
Sometimes a rose will throw out a stupidly long cane. Once it flowers, you can cut it back to a sensible length. For hybrid teas, Grandifloras, and Floribundas, you can cut to half the height of the shrub.
For ramblers and shrub roses, and Roses that only flower once, prune for shape after flowering, a bit like you would in winter.
Cutting for harvest
The sight and scent of a Rose in the home can transform your day! If you like to cut Roses for arranging, follow these steps.
Cut in the morning or evening, when temperatures are cool.
If you can time your harvest to happen a few hours after watering, your blooms will have a longer vase life.
Cut down the stem as deeply as needed for the size vase you plan to use.
Always cut to a 5-leaflet leaf, and to a node with an outward facing bud.
Immediately plunge the stem into tepid water. Increase the vase life of your bloom by making another cut underwater.
Allow the stem to drink and rest for an hour or overnight before arranging.
Remember, we are always here to help support you in your garden. If you have any questions about how to have success with Roses, stop by the nursery or give us a call!
http://ventureoutnursery.com/wp-content/uploads/2016/03/Final-Logo-1-1.jpg00Tobey Nelsonhttp://ventureoutnursery.com/wp-content/uploads/2016/03/Final-Logo-1-1.jpgTobey Nelson2021-01-19 20:27:512023-02-02 17:25:14How to Have Success with Roses
We gardeners are stewards of the earth. We share our garden not only with plants, but with the many critters that depend on them. This includes pollinators! Many species of insects and birds act as pollinators, including hummingbirds, bees, hoverflies, moths & butterflies, and more. Since pollinators are inextricably linked to food security (so many of the foods we eat require pollination, such as all fruits, beans, squashes and more), we should all be concerned about their health. Many of the choices we make as gardeners can support these creatures. Here are a few simple ways that you can help your local pollinators.
Winter-flowering plants provide food for pollinators
One of the most fun ways to help local populations of pollinators is to include winter-flowering plants in your garden. Though most of these insects hibernate during the cold temperatures, they can awaken and become active on warm days. Having a nectar source is important; it provides nourishment to them. Cheer yourself and feed these little friends with some of these winter flowers. Planting in groups can make it easier for these winged friends to find this food.
Mahonia
There are several species of Mahonia, or Oregon Grape, that you can plant in your garden. Pictured is the large evergreen shrub Mahonia x media, which is the earliest to flower. No garden should be without one! Their bright yellow flowers in December thru February are loved by hummingbirds and gardeners alike. The best part for Whidbey Island gardeners is that the deer do not love this plant!
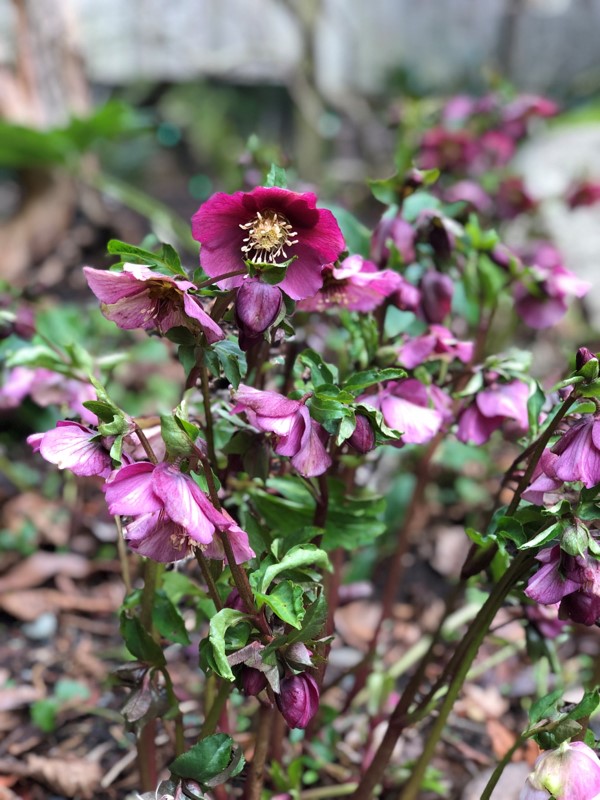
Hellebore
How about another indispensable garden plant?! This easy-to-grow evergreen perennial brings cheer and nectar with its blooms, from December through March in shades of white, cream, pink, red and even black! Another early flowering perennial worth including is Pasque Flower (Pulsatilla vulgaris).
Primrose
These delightful perennial plants can be tucked in many little spots in the garden. Use them in beds as a groundcover or between deciduous perennials, or plant in pots for a spot of winter and early spring cheer. Other plants like this to include would be Cyclamen & Pansies.
Heather
Here’s a true work-horse plant! Heathers and Heaths offer evergreen interest – especially if you choose a variety with golden or silver foliage – as well as flowers from fall through spring. These are drought tolerant and deer-resistant!
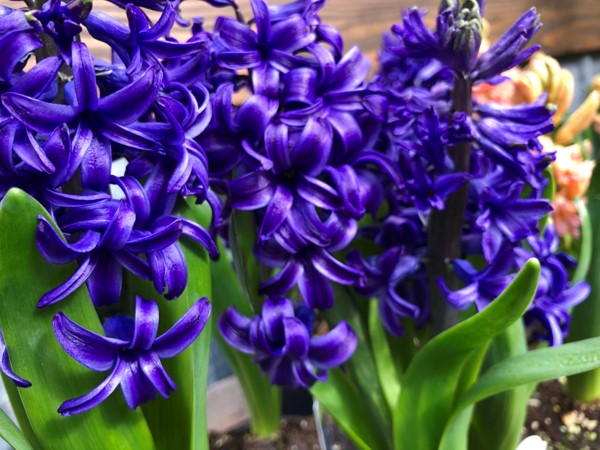
Winter & spring flowering bulbs
We can’t overlook the contribution that winter & spring flowering bulbs make to the pollinator menu. Well known blooms such as Crocus, Muscari, Dutch Hyacinth as well as lesser-known ones like Snowdrop (Galanthus) and Winter Aconite are fun to include in the garden and offer nectar as well.
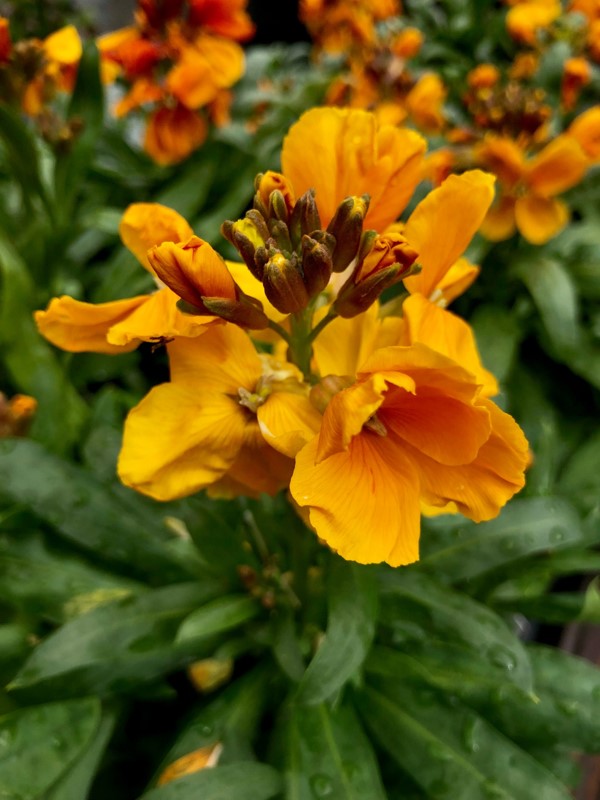
Erysimum
Deliciously fragrant Wallflower (Erysimum) is a treat for the nose as well as the pollinators. These sun-loving, drought- and deer-tolerant semi-evergreen perennials are great for early color in the garden.
Other plants that are not pictured that are great sources of nectar include early flowering trees & shrubs, such as Witch Hazel, Forsythia, Cherries, Plums, Strawberry Trees (Arbutus), Abelia, Daphne, Cornelian Cherry (Cornus mas), Hebe and others.
A “messy garden” is okay with pollinators!
It is okay with many of these creatures if you aren’t a tidy gardener. “Messy gardens” can offer food and shelter. Plants that you didn’t deadhead can throw off the random bloom in the winter, offering a meal to any nectar-lovers flying by.
Loss of habitat is a leading reason for pollinator decline. Our gardens can help offset that loss. Random garden debris, such as leaf litter, spent stems, and curled up bits of bark and branches, offers shelter and nesting spots for overwintering insects. Give yourself a break and help your garden buddies. Instead of raking every bit of debris up, leave a layer of litter and debris in place to compost and to provide this needed habitat.
Only use organic chemicals in your garden
One of the major reasons pollinator populations are in decline across the globe is exposure to harmful chemicals. Make your garden a safe place for bird and insect life (and in turn, many other forms of life) by avoiding toxic chemicals such as Weed and Feed, Preen, Nicotine-based sprays (aka neo-nicotenoids) and other insect killers.
Fall is a busy time in the garden. Here are a few helpful tips and things to think about to help you be an effective gardener during this beautiful season.
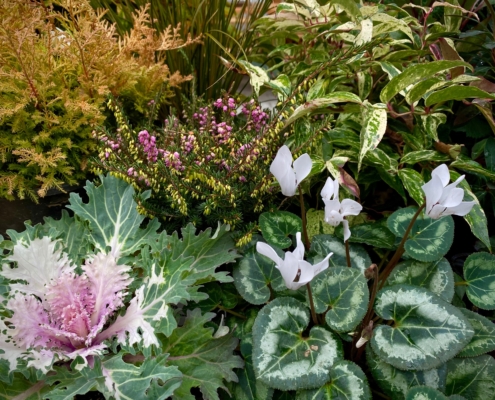
Update Pots for Winter
This is a great time to give your pots a refresh. Dig out your summer annuals and replace them with fall and winter interest plants. Consider a colorful conifer for interest every day of the year. Get your flower fix by including a winter-flowering perennial like a Heather or Hellebore. Add some evergreen grass for texture, such as Bronze Carex or Blue Fescue. Tuck in a few seasonal annuals for splash. At this time of year, choose from Pansies, Cabbage Mums, or Cyclamen. Finish it off with something like Wintergreen, which offers red berries for a final bit of zip. Don’t forget to work in a few fresh handfuls of compost or manure to give your plants the fertility they need to be their best.
Protect Your Trees, Shrubs from Deer
Late fall/early winter is rutting season. This is when bucks rub their antlers and foreheads on trees, shrubs, fenceposts, etc. to release their scent and mark their territory. Surround your plants with fencing, monofilament, or deer spray to protect them from damage. Even “deer resistant” plants are eligible for rutting damage.
If you would like to read more about protecting your plants from deer, you can read this blog post.
Tidy Up with Care
Keeping a clean garden is important for disease prevention, but it is also important to consider the birds and bugs. Strategically leave some standing dead perennials to provide winter interest in the garden, as well as food for the birds.
Any flower in the daisy family makes seeds that small birds adore. Take the easy road – instead of deadheading your Brown-Eyed Susans, Asters, and Heleniums, leave them to form seed heads. When it snows, it’s really charming to watch little birds land on these stems and peck their dinners out!
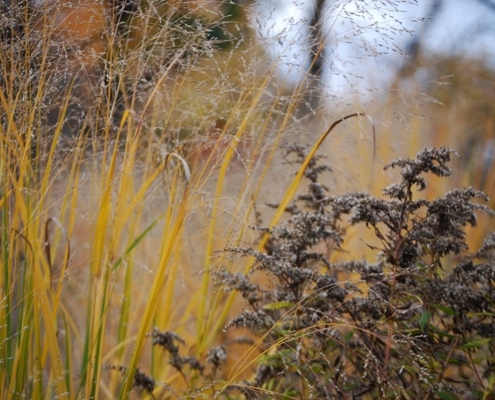
Spent stems can be beautiful! Plants such as grasses, Iris, Phlomis, Artichoke/Cardoon, Yarrow, Agapanthus, and Allium make beautiful seed heads that provide lots of interest when left standing for the winter.
Don’t get too tidy in the garden or you can clean away habitat for nature’s helpers. Creatures like ground beetles, snakes, and lizards eat slugs, slug eggs, and other bothersome critters. They need the cover of stones, branches, and leaves to hide in during the winter. Create habitat for them by leaving some of your deciduous perennials “unkempt” for the winter. Letting the foliage die back naturally and rot provides cover. You can also leave a few small logs laying around, or create small piles of stones for them to hide in. Evergreen grasses, ferns, and perennials are also wonderful shelters for these garden friends.
Stop the Pest and Disease Cycle
Keep your plants healthy next year by cleaning up diseased foliage now. Don’t perpetuate disease by composting the infected foliage; instead, throw it in the trash. This includes common garden plant diseases such as black spot, botrytis, powdery mildew, shot hole, and other fungal infections.
Prevent overwintering pests. If you have had an insect infestation in your garden, read up on how that critter overwinters, and take care to disrupt their overwintering habits in order to have fewer pests next year.
Those of us with fruit trees should clean up all fallen fruit to prevent overwintering of fruit pests such as Apple Maggot. Dispose of the fruit–do not compost it. Similarly, rake up and dispose of the leaves from any trees that have suffered from scab to prevent fungal spores from overwintering.
To cut or not to cut?
Some plants are puzzling! When should we cut them back? Here are a few ways to think about plants that I find helpful in analyzing what to cut back or not.
Meet the Silvers! These are plants like Lavender, Russian Sage (Perovskia), Lamb’s Ear (Stachys), Wormwood (Artemesia), Senecio, and so on. Pretty much any plant with silver foliage does NOT want to be cut back when it is chilly.
Another group is “plants on the verge.” These are plants that are on the verge of hardiness here in the PNW. These include any woody shrubs/perennials from warmer places, such as Pittosporum, Manzanita (Arctostaphylos), Grevillia, Leptospermum, Eucalyptus, Hebe, and so on.
Another group of plants that should NOT be cut back are the evergreen grasses. Plants such as Carex (of all types), Blue Oat (Helictotrichon), Blue Fescue (Festuca), Mondo (Ophiopogon), and Lilyturf (Ophiopogon) are all grasses that prefer to be left alone and should rarely be cut back! If these plants start looking tattered, you can cut them back in the spring when temps start to warm and your lawn is waking up. Follow a trim with an application of a nitrogen fertilizer for the best regrowth. Only cut these plants back every several years.
Reconfigure
Since fall is the best time for planting and transplanting, it’s a great time to take a fresh look at your garden. Did it work this year? Are there changes you’d like to make? Do you have enough winter interest? Take advantage of low-stress weather (for the digger and the plant!), as well as the many root-growth cycles that autumn and winter offer and make your garden edits and additions now.
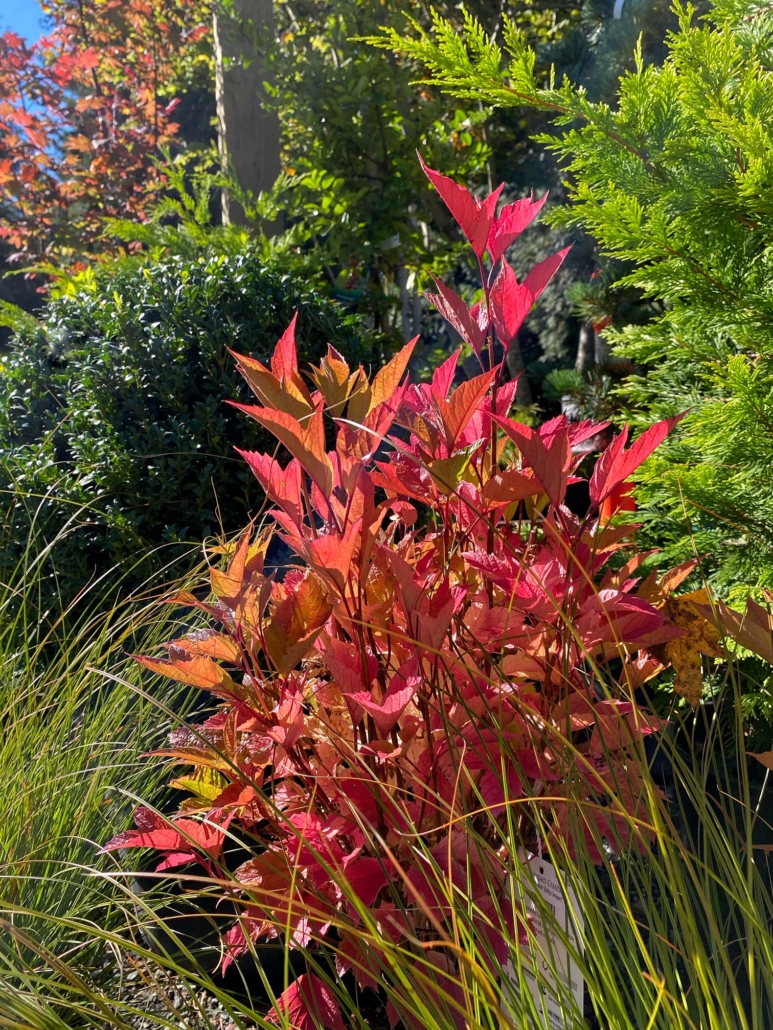
Shop for Fall Color
The best time to buy a plant for its fall color is when it’s showing it. Come on over to Venture Out to see the show and make your selection. Here are a few of my favorite plants for fall foliage:
Sumac (Rhus) ‘Gro-Lo’
Dogwood (Cornus) ‘Baileyi’
Cranberry Viburnum ‘Winterthur’
Witch Hazel (Hamamelis)
Cherry (Prunus)
Maple, especially Acer ginnala
Smoke Bush (Cotinus)
Barberries (Berberis)
Serviceberry (Amelanchier)
Shop for Winter Interest
When the leaves are falling, it’s a good time for plants to reveal their winter charms, bringing the focus to their forms, bark, or persistent berries/fruit. Here are a few of my favorite plants for winter interest:
Oakleaf Hydrangea (Hydrangea quercifolia)
Vine Maple (Acer) ‘Pacific Fire’
Striped Bark Maple (Acer tegmentosum)
Spindle Tree (Euonymus europea)
Hawthornes Crataegus lavallei or ‘Winter King’
Crabapples (Malus), especially ‘Golden Raindrops’
Korean Dogwood (Cornus kousa)
Stewartia pseudocamellia or monadelpha
And then, of course, there are all the colorful conifers that number too many to talk about here. (Learn more about my favorite conifers in this blog post.)
Protect and Improve Your Soil
This is the time for making compost, spreading compost, mulching, and for planting cover crops. Mulches and cover crops help protect your soil from erosion caused by winter rains. They can help keep nutrients from being carried away with the rain, and they can help prevent cool-season weeds from germinating.
Fall clean up offers lots of material for the compost. Remember that fallen leaves and spent plants are often a great source of trapped nutrients. Adding this plant material to your compost will make it more nutritious for the next plants to receive it. Maintain the potency of the compost pile by keeping it covered so rain doesn’t wash away all its goodness.
Prepare for spring beauty!
Look ahead and plan your spring garden now! Plant bulbs such as Daffodil, Hyacinth, and Tulip for a welcome blast of color in the spring. Protect them from squirrels digging by covering the planting area with a piece of hardware cloth staked over the bulbs. In my garden, Daffodils, Alliums, and Dutch Hyacinth are the most deer resistant of the bulbs.
Sow cool season annual seeds like Love in a Mist (Nigella) and Larkspur.
October and November are also the best months to plant garlic!
Prune
Once a plant has lost its leaves, it is safe for pruning. This is the easiest time to see the skeleton of the plants. It is really best to wait until the plant has been dormant for a while. Fall is an okay time for light pruning.
Winterize
Prepare for freezing and windy weather. Turn off and winterize your irrigation system. Drain and hang hoses. Protect spigots with insulating covers.
Bring in any tender patio plants that you wish to overwinter, such as Hibiscus, Princess Flower (Tibuchina), Bougainvillea, Mandevilla, Geranium, tender Succulents, and so on.
Windproof your garden. Store your patio furniture. Make sure row covers are weighted down. Tidy away buckets, watering cans, etc.
Slug and Snail Control
Whenever it is moist, slugs and snails flourish! Protect your plants by using a non-toxic, iron phosphate-based slug bait like Slug Magic or Sluggo. Products like these control the slug and snail population without causing danger to dogs and cats.
Certainly, this isn’t ALL there is to do in the fall garden, but hopefully this helps you get started!
Deer are a part of life on South Whidbey. They are often seen wandering the roadsides, strolling the outskirts of town, and munching their way through local gardens. For newcomers to the island, deer sightings illicit delight: “They’re so cute!” But this attitude quickly changes with the first forays into gardening here on the rock.
If you don’t experience problems with deer in your landscape, count yourself lucky! For the rest of us, these cute creatures can be a real nuisance. Here are some strategies for gardening in deer country.
Choose Deer Resistant Plants
This is a first step, but we have to be honest: no plant is 100% “deer proof. Whidbey deer have been known to consume even the most thorny, stinky, and downright poisonous plants known to gardeners. From Barberry to Euphorbia, Japanese Forest Grass to Foxglove, no plant on our island seems to be safe.
Young deer, especially, are willing to try just about anything. And “try” doesn’t always mean an exploratory nibble: sometimes the critters strip several branches before deciding they don’t like it.
Here at Venture Out Nursery, we offer a list of “Deer Resistant Plants” to our customers. It includes the prickly, smelly, and toxic options mentioned above, as well as beautiful and worthy things like Russian Sage, Yarrow, Bear’s Breeches, and Hellebore. But it comes with this disclaimer: no plant is 100% deer proof. What a deer will eat may depend on the herd, the season, the location of the plant, and what other food is available nearby.
Use Barriers
Try these options to protect your landscaping from the cute invaders:
Build a deer-proof fence. Deer can jump up to 8 feet high, so make sure your fence is tall enough to deter them.
Protect tempting plants with chicken wire.
Protect plants with fishing line. Drive three to five wooden stakes into the ground around the plant or tree, then wrap the perimeter in fishing line, spiraling from bottom to top. You can leave about 6” between each wrap. Deer are uncomfortable ducking their heads into small spaces, so the fishing line provides an effective barrier, and, possibly, a more attractive option than chicken wire. Make sure your stakes are tall enough to protect the desired plant or tree: deer can stand on their hind legs to reach those upper limbs!
Use Repellents
Deer seem to be especially interested in new plantings, often devouring plants within the first week of them being planted. Make the first introduction a negative experience by keeping new plants well-doused with deer repellent spray. Here at Venture Out, we carry a non-toxic formula that is safe for people, pets, and wildlife. Made from hot peppers and putrescent egg solids, these sprays effectively repel deer as well as rabbits and squirrels. It is even safe to use on fruits and vegetables. Just remember to wash it off before you take a bite, so you don’t get surprised by a yucky, spicy mouthful! Reapply frequently in rainy weather.
Even Deer-Resistant Plants Need Protection During the Fall
Eating plants isn’t the only way that deer can wreck a garden. The autumn through early winter is rutting season, when the deer are mating. Male deer can do serious damage to the garden. They rub their antlers on any tree or shrub in their path in order to leave their scent and thereby define their territory and attract mates. Discourage damage to your plants by protecting them with chicken wire or fishing line during this time of year.
We hope some of these techniques prove useful in your landscape! Please visit us at the nursery for more ideas for keeping your garden beautiful despite living in deer country.
Written by Olivia Round & Tobey Nelson.
Learn about some of Tobey’s favorite deer resistant plants and tips in this video!
http://ventureoutnursery.com/wp-content/uploads/2016/03/Final-Logo-1-1.jpg00Tobey Nelsonhttp://ventureoutnursery.com/wp-content/uploads/2016/03/Final-Logo-1-1.jpgTobey Nelson2020-10-23 21:12:322022-12-06 19:57:22Oh, Deer! Winning the Battle with Whidbey Island’s most Notorious Garden Pests
Fall is a great time to plant here in the Pacific Northwest. Cool temperatures and increased moisture mean lower transpiration rates, making fall planting and transplanting less stressful for a plant than in spring or summer.
Don’t wait for spring!
Fall-planted trees, shrubs, and perennials develop more established root systems. Plants that seem to be “sleeping” during the winter are actually hard at work growing roots. Between October and March, there are several root growth cycles. A shrub planted in the fall will be more robust and resilient than the same shrub planted the following spring.
Do plant before the ground freezes!
Plants are more insulated in the ground than above it. If you have plants still sitting around in their pots, it’s better to get them into the ground than to leave them unplanted. Even if you are unsure of where they should go, plant them somewhere. You can always transplant them later! If you must leave plants unplanted, bring them into a cool garage or at least insulate their pots/root balls with some mulch, in a pile of autumn leaves, or stack some evergreen boughs around them. If you can get a shovel in the ground with relative ease, you can plant, which is the best solution.
Do check for water!
Our abundant rainfall in winter usually means less work for the gardener. Soils typically remain moist between October and April. But sometimes we see dry spells, and winter winds can be desiccating. Areas under eaves or large evergreens can tend toward the dry side as well. Don’t assume that since it is raining, your plants are well watered. Do go out and feel the soil to see if it is moist several inches down. You may need to supplement occasionally.
Do mulch!
Our fall and winter temperatures can vary, and these temperature changes can be a bit hard on roots. Providing a nice blanket of mulch can help moderate soil fluctuations, which your plants will appreciate. Plus, keeping the soil “in the dark” will suppress those cool-season weeds! Just remember to keep the mulch away from the trunks and crowns of your trees and shrubs, and don’t bury your perennials!
Do consider staking!
During the winter, we can get winds that can impact unrooted trees. Do consider staking fall-planted trees to help keep them straight. Remember to give them some wiggle room and not tie them too tightly. Here is a short video guide from the International Society of Arboriculture for staking trees.
Don’t fertilize!
Fertilizing can confuse a plant, making it think it is time to grow when it’s not. Fall-planted trees and shrubs rarely need any fertilizer. It is best to wait until March or April to feed your plants.
Don’t prune!
In general, it is best not to cut back plants at the time of planting. The exception would be any broken branches. Keep the trimming of newly planted trees and shrubs to a minimum at this time.
I hope this article has encouraged you to keep gardening this autumn! Take advantage of the benefits of this time of year and invest in the beauty of your yard and garden for all the seasons to come.
http://ventureoutnursery.com/wp-content/uploads/2016/03/Final-Logo-1-1.jpg00Tobey Nelsonhttp://ventureoutnursery.com/wp-content/uploads/2016/03/Final-Logo-1-1.jpgTobey Nelson2020-10-01 21:59:452020-10-20 17:39:20Fall Planting Dos and Don’ts for the Pacific Northwest
Landscaping in the Pacific Northwest comes with plenty of challenges: from deer and rabbits decimating garden beds, to clay soil rotting roots, and summers without natural irrigation. Another challenge often not considered in our NW climate are the freezing temperatures in the winter. While we do have milder temperatures than much of the US, the past few years have shown a colder side to winter. Most gardeners on the island will have a hard time forgetting the snowmageddon of last February, and many are still dealing the damages caused by that late winter storm. While not everything is preventable, there are offseason tasks that help limit the damages from a sub-freezing blast.
The post-season clean up: While most people are finding more excuses to be indoors, pests and pathogens are also trying to avoid the cold. Leaf litter, cluttered branches, and fallen debris are the perfect habitat for unwanted garden visitors. Air circulation is crucial for limiting diseases. Pruning to encourage air flow between individual trees—as well as in the plant itself—is a method of prevention. Crossing and clustered branches should be pruned out in the early fall so the plant has time to seal the pruning cuts before going dormant. Leaf litter and debris should be collected out of the garden to limit the pathogens overwintering.
Mulch: Now that the garden has been cleaned, it’s time to put down a protective layer of mulch. Aged bark and compost blends add the most nutrients and provide organic material to improve the soil. Apply the mulch thickly to the beds, but take care not to suffocate the trees and shrubs by covering their crowns. The area where the trunk meets the roots demands oxygen flow, so be sure to leave a 1-2’ circumference around the base of trees and shrubs. Dormant perennials, however, can benefit from extra mulch on top of the crown. Plants that die all the way back to the ground, like agapanthus, artichokes, and joe pie weed, can have mulch added on top to protect the crown from the frost.
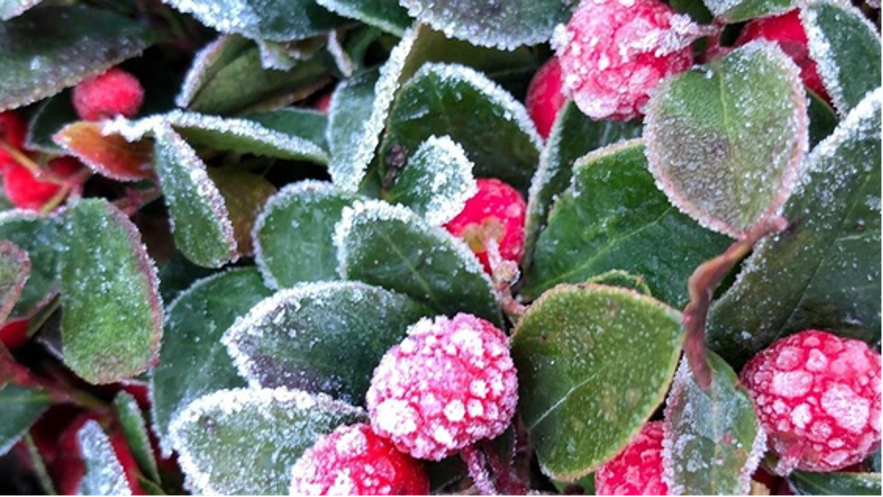
Sub-freezing protection: Most winters in the Pacific Northwest have sporadic freezing and thawing periods throughout the season, but hardy plants will survive without extra protection. There are times, however, when the weather forecast can show below freezing for more than a week. If this is the case, the first thing gardeners should do is water. While it might seem counter intuitive to water in the part of the country known best for its excessive rainfall in the winter, once the water freezes it will be unavailable for the plant to use. Garden beds have usually stored up enough rainfall by this time of year to not bother watering, however containers and any plants under a cover will need to be checked. If the soil is dry before the freeze, it will remain that way until the temperatures thaw it again. Be careful not to get any water on the leaves as frozen water droplets will damage evergreen foliage.
Once the containers have the proper water level, some of
them might need to be protected if the freezing reaches less than 25 degrees. Containers
do not protect roots as well as in garden beds, because the roots are
essentially above ground. If the plants are in a ceramic container, make sure
the walls of the pot are thick enough to block the frost from damaging the
roots. If you have frost-proof pottery, then the walls will be thick enough. Terra
Cotta and plastic are often not thick enough to protect roots in severe
weather.
To help a plant’s survival, wrap the plant base in blankets,
thick plastic, or surround them with mulch to add an extra layer of protection.
Plastic and blankets can also be used to cover tender foliage and buds from the
freeze. Some winters we have warm weather before a hard frost, so the plant is tricked
into beginning to wake up for spring before getting blasted by the freeze. If
new growth or flower buds are forming before the hard freeze is predicted, the
plastic or blankets can help reduce the damage.
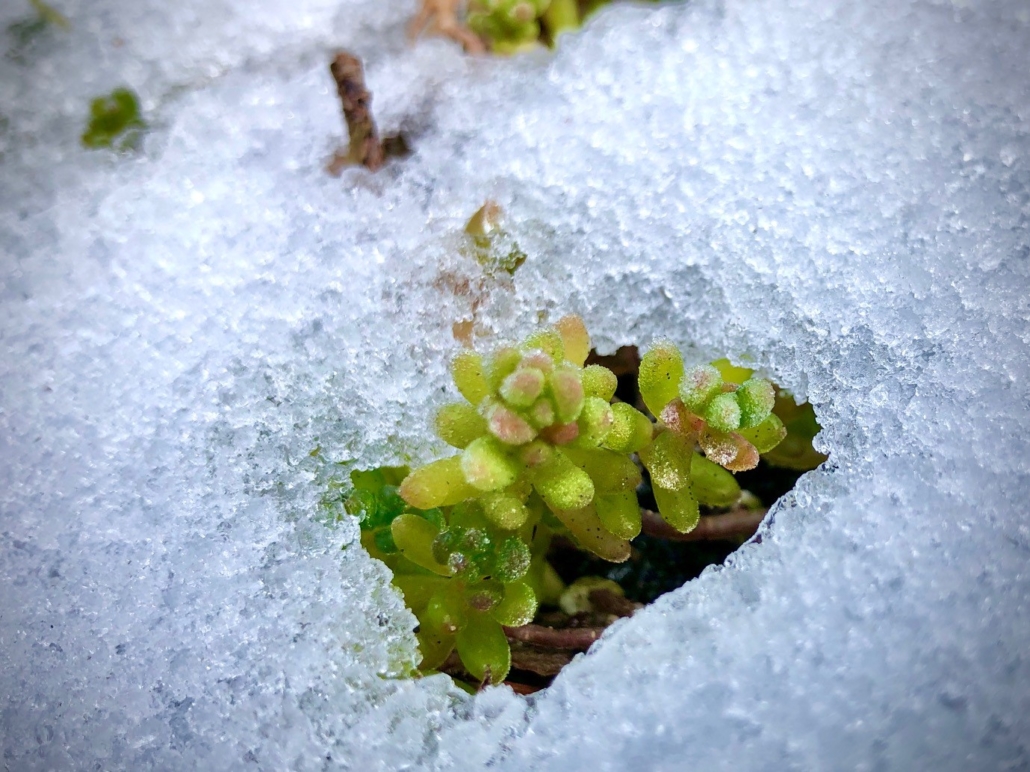
Snow: The best scenario for a week of sub-freezing temperatures is to start the week off with a snowstorm. Snow acts as an insulator that can save cold damage from occurring if it’s left in place. Restrain the urge to uncover your plants from the snow and let nature’s insulation work its magic. The only exception is heavy snow that can sometimes break off limbs. If any tree or shrub looks as if the whole limb is bent past its limit, removing the snow to release the pressure can help save the limb. Know that by doing this, you are exposing the foliage to the freeze, but potentially saving the branch from breaking under the weight of the snow.
While the tasks listed above can help prevent the damage and
loss of plants in the winter, the best prevention is always plant selection.
While some winters are safe for higher-zoned plants, the best insurance is
still to select plants for lower zones. The Pacific Northwest is usually a USDA
Zone 8, which means plants can survive around 20 degrees Fahrenheit. There are
still wind chill and microclimates on the island to account for, so plants zoned
for 7 or lower have the best chance of surviving extreme sub-freezing
temperatures.
Like most of gardening, there is a trial and error aspect to
finding the right plant selection for your particular garden. Our aim with this
post is to help you give plants enduring winter the best chance to thrive in the
coming spring.
-Your friends at
Venture Out
http://ventureoutnursery.com/wp-content/uploads/2016/03/Final-Logo-1-1.jpg00Venture Out Teamhttp://ventureoutnursery.com/wp-content/uploads/2016/03/Final-Logo-1-1.jpgVenture Out Team2020-01-23 23:49:282020-10-20 17:40:06How Can You Help Your Plants Thrive During the Winter?